MacOS OpenCV C++ in XCode
MacOS: OpenCV C++ in XCode
This post will show you how to setup your C++ OpenCV algorithm project in MacOS using Apple’s Xcode IDE.
Getting Started
In this section we’ll setup a new C++ command line tool project in Xcode. Then we’ll add OpenCV to the project. Then we’ll look at three ways of capturing images using OpenCV; reading image from disk, reading frames from a video and capturing frames from the webcam. This is the point you’ll have a chance to process the image. For this post we’ll simply display the image back to the user.
The steps we’ll take:
Install Xcode and Create new Xcode project
Installing OpenCV
Linking OpenCV
Reading images from disk
Reading video from disk
Streaming the camera feed
Running the tool from the command line
We’ll making use of command line using Terminal. During this post make sure to have the Terminal app open.
1. Install Xcode and Create new Xcode project
Install Xcode
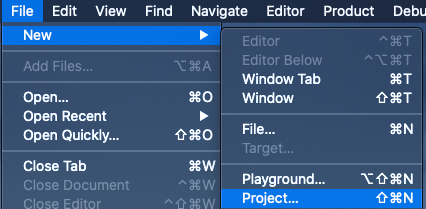
Then, create a new Xcode project. From menu select *File* > *New* > *Project…*

When prompted “*Choose a template for your new project:*” search and select Command Line Tool under macOS tab. Then click Next.

Then when prompted “*Choose options for your project:*” name the product MyOpenCVAlgorithm. For the “*Language:*” select C++. Then click Next.
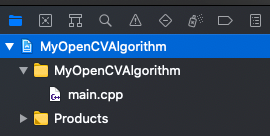
Xcode will create a very simple command line based app project that just contains a single file names main.cpp. Let’s run the tool. From menu select Product* > Run*.

2. Installing OpenCV
To install OpenCV we’ll be making use of command line tool Homebrew. Open Terminal app and run the following command:
Once Homebrew is installed run the following command to install OpenCV:
To select a specific OpenCV version (e..g Opencv 3)
First, check which versions are available. Then choose the specific version (e.g. opencv@3)
The installation may take a while. Homebrew will download the OpenCV code and other code it depends on. Then Homebrew will build OpenCV for you.
Once the installation is finished you should find the OpenCV installation under /usr/local/Cellar/opencv/<VERSION>. At the time of writing the latest version of OpenCV on Homebrew is 4.5.0.

OpenCV is now installed in our machines. However OpenCV is still not installed or linked to our Xcode project.
3. Linking OpenCV
In this step we will link OpenCV to our MyOpenCVAlgorithm command line tool target. Here is what we need to do to link OpenCV:
Link the OpenCV library modules (Other Linker Flags)
Tell Xcode where the library modules live or rather where to look for them (Library Search Paths)
Tell Xcode where to find the public interfaces for the functionality contained within the library (Header Search Paths)
To find out the information we need to supply Xcode settings we’ll make use of pkg-config to tell us about it.
First let’s install pkg-config. Run the following command:
Once the installation is complete run the following command:
OpenCV installation will already have placed a file in /usr/local/lib/pkgconfig.

Now we can use pkg-config to query the configuration settings for OpenCV. Run the following command:
The above command outputs the OpenCV libraries list and copies it to our clipboard ready to pasted.

Next let’s link OpenCV to our proejct. Open or go back to the project in Xcode. Open the project navigator (from menu select *View* > *Navigators* > *Project*) then select MyOpenCVAlgorithm project configuration file (the one with the blue icon).
Open project navigator on the right hand side pane

Select the project configuration file from the project navigator pane

Next select MyOpenCVAlgorithm under “Targets*”.* Then select *Build settings* tab.

Search “*Other Linker Flags*” and the paste the value(⌘V keys) in clipboard on the Other Linking Flags settings.

That’s the OpenCV library linked. However for now we have only told Xcode the names of the modules we want to link to but not where to find them. Let’s fix that.
First let’s find out where the OpenCV modules live. Run the following command:
Again we have asked pkg-config for the answer and copied the value to the clipboard. Search “*Library Search Path*” and paste (⌘V) the value on the clipboard as the value.
Settings Library search paths in Xcode:

So far we have linked the OpenCV code to our command line app. However to consume the code we need tell Xcode where OpenCV’s public interface is–or in C++ the headers files location.
Again let’s ask pkg-config for the location. Run the following command:

Next let’s tell Xcode where the header files are. In build settings search “*Header Search Path*” and paste in the value from the clipboard.
Setting Header search paths in Xcode:

Let’s run the app. From menu select *Product* > *Run*. You should encounter an error such as the following:
This happens because by default apps built through Xcode have codesigning policies enabled. All the app code including its dependencies must be codesigned by the same developer. Let’s disable that for its dependencies.
Select MyOpenCVAlgorithm project configuration file on the project navigator. Then from the main pane select MyOpenCVAlgorithm under “*Targets*” and then select “*Signing & Capabilities*” tab. Scroll to the “*Hardened Runtime*” section and remove the whole section.

Note Hardened Runtime is intended to protect the runtime integrity of your app. If you intend to distribute you application I would recommend you not to delete this section and invest time and effort in securing your app. For this post the intention is to run it locally for development of you OpenCV C++ algorithm.
3. Example Code: load an image
In this step we’ll use OpenCV to load an image and display it to the screen.
Open main.cpp and the following line after #include <iostream>:
Create main.cpp.
Prepare an image file to read: e.g opencv-logo.jpg
We will load and read the image from disk using OpenCV’s imread function and store it in OpenCV image object (cv::Mat image).
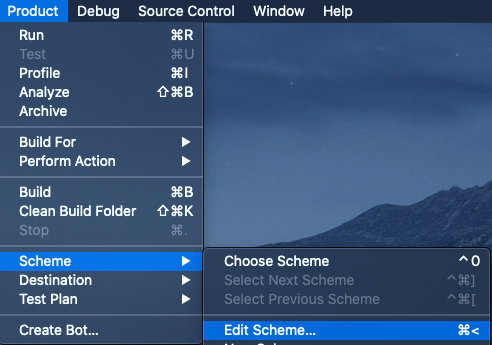
Let’s provide an image to our command line tool. From menu select *Product* > *Scheme* > *Edit Scheme…*

Then select *Run* > *Argument* and add the following argument:

Run the app by selecting from menu *Product* > *Run*.

Note I added the OpenCV logo image to the project and set the image path using the Xcode project path variable SRCROOT.