Tutorial: Train Yolo v8 with custom dataset
This tutorial is about learning how to train YOLO v8 with a custom dataset of Mask-Dataset.
This Tutorial also works for YOLOv5
Step 0. Install YOLOv8 in local drive
Follow Tutorial: Installation of Yolov8
Step 1. Create Project Folder
We will create the working space directory as
\DLIP\YOLOv8\
Then, create the sub-folder
/datasets
in the same parent of/yolov8
folder
Step 2. Prepare Custom Dataset
Download Dataset and Label
We will use the Labeled Mask YOLO to detect people wearing mask.

This annotation file has 4 lines being each one referring to one specific face in the image. Let’s check the first line:
0 0.8024193548387096 0.5887096774193549 0.1596774193548387 0.2557603686635945
The first integer number (0) is the object class id. For this dataset, the class id 0 refers to the class “using mask” and the class id 1 refers to the “without mask” class. The following float numbers are the xywh
bounding box coordinates. As one can see, these coordinates are normalized to [0, 1]
.
Download the dataset : Labeled Mask YOLO.
Under the directory
/datasets
, create a new folder for the MASK dataset. Then, copy the downloaded dataset under this folder. Example:/datasets/dataset_mask/archive/obj/

The dataset is indeed a bunch of images and respective annotation files:
Visualize Train Dataset image with Boundary Box and Label
Under the working space (
YOLOv8/ )
, create the following python file (visualizeLabel.py
) to view images and labels.Download code here
## Visualize B.Box and Label on Train Dataset
import cv2
image_path = 'datasets/dataset_mask/archive/obj/2-with-mask'
image = cv2.imread(image_path + '.jpg')
class_list = ['using mask', 'without mask']
colors = [(0, 255, 0), (0, 255, 255)]
height, width, _ = image.shape
T=[]
with open(image_path + '.txt', "r") as file1:
for line in file1.readlines():
split = line.split(" ")
# getting the class id
class_id = int(split[0])
color = colors[class_id]
clazz = class_list[class_id]
# getting the xywh bounding box coordinates
x, y, w, h = float(split[1]), float(split[2]), float(split[3]), float(split[4])
# re-scaling xywh to the image size
box = [int((x - 0.5*w)* width), int((y - 0.5*h) * height), int(w*width), int(h*height)]
cv2.rectangle(image, box, color, 2)
cv2.rectangle(image, (box[0], box[1] - 20), (box[0] + box[2], box[1]), color, -1)
cv2.putText(image, class_list[class_id], (box[0], box[1] - 5), cv2.FONT_HERSHEY_SIMPLEX, .5, (0,0,0))
cv2.imshow("output", image)
cv2.waitKey()
You will see this result

Step 3. Split Dataset
The YOLO training process will use the training subset to actually learn how to detect objects. The validation dataset is used to check the model performance during the training.
We need to split this data into two groups for training model: training and validation.
About 90% of the images will be copied to the folder
/training/
.The remaining images (10% of the full data) will be saved in the folder
/validation/
.
For the inference dataset, you can use any images with people wearing mask.
Under the working directory create the following python file split_data.py
.
Download code here
This code will save image files under the folder /images/
folder and label data under the folder /labels/
Under each folders,
/training
and/validation
datasets will be splitted.
# Split Dataset as Train and Test
import os, shutil, random
# preparing the folder structure
full_data_path = 'datasets/dataset_mask/archive/obj/'
extension_allowed = '.jpg'
split_percentage = 90
images_path = 'datasets/dataset_mask/images/'
if os.path.exists(images_path):
shutil.rmtree(images_path)
os.mkdir(images_path)
labels_path = 'datasets/dataset_mask/labels/'
if os.path.exists(labels_path):
shutil.rmtree(labels_path)
os.mkdir(labels_path)
training_images_path = images_path + 'training/'
validation_images_path = images_path + 'validation/'
training_labels_path = labels_path + 'training/'
validation_labels_path = labels_path +'validation/'
os.mkdir(training_images_path)
os.mkdir(validation_images_path)
os.mkdir(training_labels_path)
os.mkdir(validation_labels_path)
files = []
ext_len = len(extension_allowed)
for r, d, f in os.walk(full_data_path):
for file in f:
if file.endswith(extension_allowed):
strip = file[0:len(file) - ext_len]
files.append(strip)
random.shuffle(files)
size = len(files)
split = int(split_percentage * size / 100)
print("copying training data")
for i in range(split):
strip = files[i]
image_file = strip + extension_allowed
src_image = full_data_path + image_file
shutil.copy(src_image, training_images_path)
annotation_file = strip + '.txt'
src_label = full_data_path + annotation_file
shutil.copy(src_label, training_labels_path)
print("copying validation data")
for i in range(split, size):
strip = files[i]
image_file = strip + extension_allowed
src_image = full_data_path + image_file
shutil.copy(src_image, validation_images_path)
annotation_file = strip + '.txt'
src_label = full_data_path + annotation_file
shutil.copy(src_label, validation_labels_path)
print("finished")
Run the following script and check your folders
Step 4. Training configuration file
The next step is creating a text file called maskdataset.yaml
inside the yolov8
directory with the following content.
Download code here
train: ../datasets/dataset_mask/images/training/
val: ../datasets/dataset_mask/images/validation/
# number of classes
nc: 2
# class names
names: ['with mask', 'without mask']
Step 5. Train Model
change batch number and epochs number for better training
Create the following python file ( Yolov8_train.py
) to train model.
Download code here
from ultralytics import YOLO
def train():
# Load a pretrained YOLO model
model = YOLO('yolov8n.pt')
# Train the model using the 'maskdataset.yaml' dataset for 3 epochs
results = model.train(data='maskdataset.yaml', epochs=3)
if __name__ == '__main__':
train()
Finally, in the end, we have the following output:

Now, confirm that you have a yolov8/runs/detect/train/weights/best.pt
file:
Depending on the number of runs, it can be under
/train#/weights/best.pt
, where #:number of trainFor my PC, it was train3

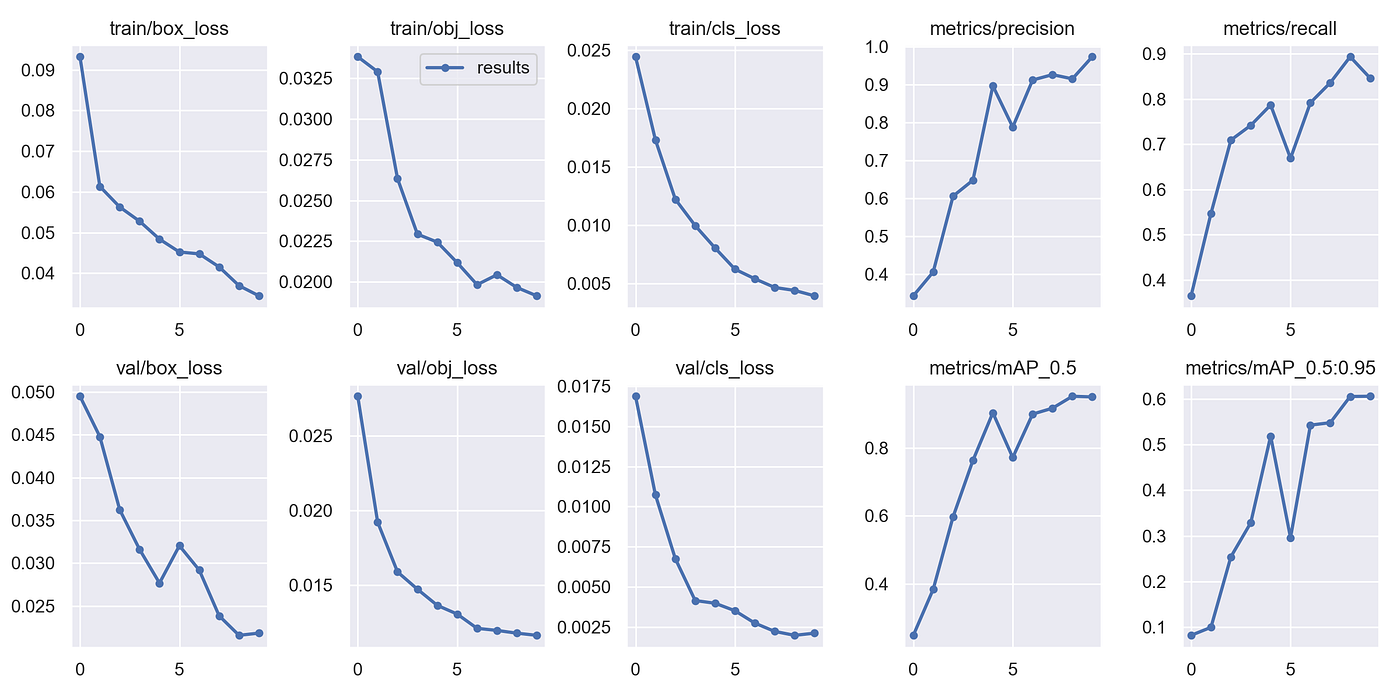
Also, check the output of runs/detect/train#/results.png
which demonstrates the model performance indicators during the training:
Step 6. Test the model (Inference)
Now we have our model trained with the Labeled Mask dataset, it is time to get some predictions. This can be easily done using an out-of-the-box YOLOv8 script specially designed for this:
Download a test image here and copy the file under the folder of yolov8/datasets/dataset_mask/images/testing
Create the following python file ( Yolov8_test.py
) to test model.
Download code here
from ultralytics import YOLO
import cv2
def test():
# Load a pretrained YOLO model(Change model directory)
model = YOLO('runs/detect/train4/weights/best.pt')
# Inference Source - a single source(Change directory)
src = cv2.imread("datasets/dataset_mask/images/testing/mask-teens.jpg")
# Perform object detection on an image using the model
result = model.predict(source=src, save=True, save_txt=True) # save predictions as labels
# View result
for r in result:
# print the Boxes object containing the detection bounding boxes
print(r.boxes)
# Plot results image
print("result.plot()")
dst = r.plot() # return BGR-order numpy array
cv2.imshow("result plot", dst)
# Plot the original image (NParray)
print("result.orig_img")
cv2.imshow("result orig", r.orig_img)
# Save results to disk
r.save(filename='result.jpg')
cv2.waitKey(0)
if __name__ == '__main__':
test()
Your result image will be saved under runs/detect/predict#/
NEXT
Test trained YOLO with webcam
Last updated
Was this helpful?