BakeryCashier

Bread Auto-Calculator

Date: 2022/06/20

Author: Song Yeong Won/ Song Tae Woong

Github: repository link

Demo Video: Youtube link

Introduction

In this project, we want to implement an automatic bread calculator for quick and quick work processing. This program aims to increase work efficiency by quickly and accurately detecting and calculating bread in bakery stores. In addition, it is intended to reduce the inconvenience of having to take direct barcodes and increase the convenience of users. A total of five types of bread were used as objects in this program, and Apple in the tree at Handong University was used.

Since the YOLOv5 model was directly trained and used through Custom-data, the DarkLabel 2.4 program was used to generate additional training data. We used YOLOv5 open source and Python via Anaconda virtual environment in Visual Studio Code.

1. Requirement

Hardware

  • NVDIA GeForce RTX 3080

  • HD Pro Webcam C920

Environment constraint

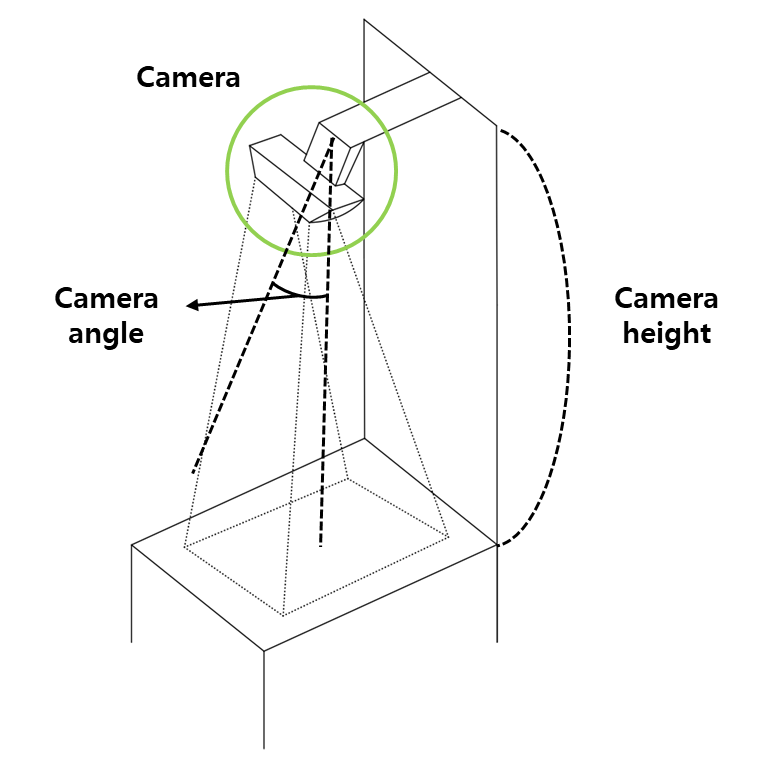
  • Camera angle : 37.5 degree

  • Camera height : 47[cm] from Tray

    Figure 1. Experiment Environment

Software Installation

software specification as follow :

  • CUDA 11.6

  • cudatoolkit 11.3.1

  • Python 3.9.12

  • Pytorch 1.10

  • YOLOv5l model

Anaconda settings

before starting, check if the GPU driver for the cuda version is installed.
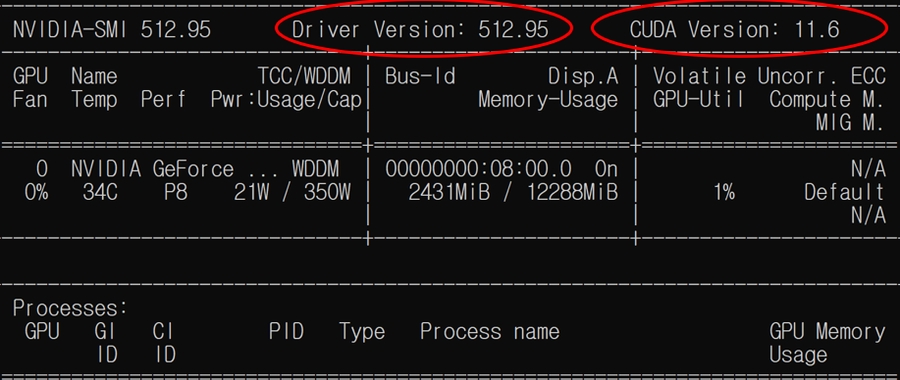
# Check your CUDA version
> nvidia-smi

Figure 2. Check CUDA Version

check your cuda version and donwload nvidia driver click here

# create a conda env name=py39
conda create -n py39 python=3.9.12
conda activate py39
conda install -c anaconda seaborn jupyter
pip install opencv-python

# pytorch with GPU
conda install -c anaconda cudatoolkit==11.3.1 cudnn seaborn jupyter
conda install pytorch=1.10 torchvision torchaudio cudatoolkit=11.3 -c pytorch
pip install opencv-python torchsummary

# Check GPU in Pytorch
conda activate py39
python
import torch
print("cuda" if torch.cuda.is_available() else "cpu")

YOLOv5 Installation

Go to YOLOv5 github (https://github.com/ultralytics/yolov5) and download Repository as below. After entering the /yolov5-master folder, copy the path address. Then executing Anaconda prompt in administrator mode, execute the code below sequentially.

conda activate py39
cd $YOLOv5PATH$ // [ctrl+V] paste the copied yolov5 path
pip install -r requirements.txt

Labeling

  • DarkLabel2.4

The DarkLabel 2.4 program was used to generate custom data. Using this program, bounding box labeling was performed directly for each frame of the video to create an image and label dataset. Compared to other labeling programs, labeling work through images is possible, so it is possible to generate a lot of training data quickly.

Go to DarkLabel 2.4 and download the DarkLabel 2.4 program below. if it is not available, please download here
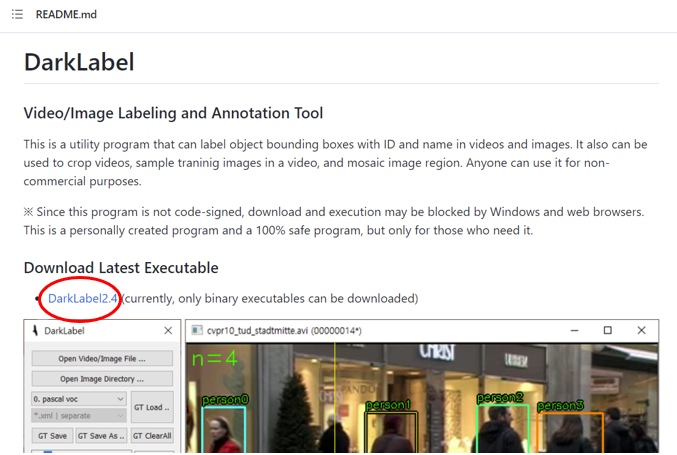
Figure 3. DarkLabel2.4

After executing DarkLabel.exe, labeling is performed using the desired image or image.

Figure 4. DarkLabel2.4 Tool

  1. Image file path for using image files

  2. Using Darknet yolo labeling method

  3. To using your customized labels for model training, the number of data and class name of coco dataset must be changed.

change the Number 0 - 5 COCO dataset classes : [‘person’, ‘bicycle’, ‘car’, ‘motorcycle’, ‘airplane’, ‘bus’] -> 6 COCO based custom dataset classes : [‘Apple Tart’, ‘Croissant’, ‘Chocolate’, ‘Bagel’, ‘White Donut’, ‘Pretzel’]

  1. save labels

  2. save images

for example using darklabel2.4 program :
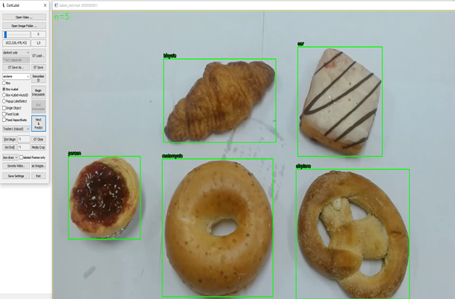
Figure 5. Example of using DarkLabel2.4

If you keep pressing the space, you can quickly label the image because you keep tracking the image with the bounding box over every frame and draw the bounding box. However, if an object is moved or obscured, it will not be accurate tracking, so such frames should be re-run after removing the image labeling.

2. Training Procedure

Pretrained Checkpoints

The model should be selected in consideration of the accuracy and processing speed suitable for the purpose. This project used the YOLOv5l model. The model should be appropriately selected according to GPU Driver performance. It is also important to select the batch size that GPU cuda memory can allocate. Batch size = 4 was applied to this model learning. If you use a better hardware GPU driver, you can use a YOLOv5l or higher model.

The results of precision and recall learned through the YOLOv5l model will be mentioned in the 4. Evaluation part.

Model

size (pixels)

mAPval 0.5:0.95

mAPval 0.5

Speed CPU b1 (ms)

Speed V100 b1 (ms)

Speed V100 b32 (ms)

params (M)

FLOPs @640 (B)

640

28.0

45.7

45

6.3

0.6

1.9

4.5

640

37.4

56.8

98

6.4

0.9

7.2

16.5

640

45.4

64.1

224

8.2

1.7

21.2

49.0

640

49.0

67.3

430

10.1

2.7

46.5

109.1

640

50.7

68.9

766

12.1

4.8

86.7

205.7

1280

36.0

54.4

153

8.1

2.1

3.2

4.6

1280

44.8

63.7

385

8.2

3.6

12.6

16.8

1280

51.3

69.3

887

11.1

6.8

35.7

50.0

1280

53.7

71.3

1784

15.8

10.5

76.8

111.4

1280 1536

55.0 55.8

72.7 72.7

3136 -

26.2 -

19.4 -

140.7 -

209.8

Table 1. Model Performance

Further more information : Click here

2.1 Customize datasets
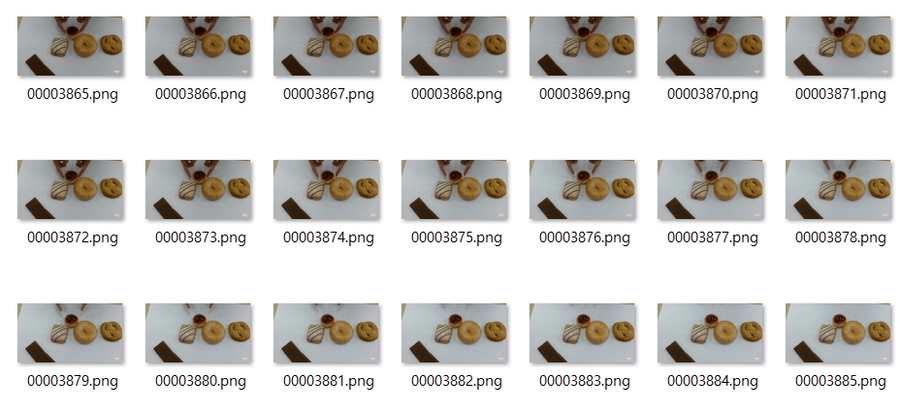
Images data

Labels

For training using the YOLOv5 model, an image file and a labeling coordinate file are required as shown in Figure 6. We previously generated the data in Figure 6 using the Dark Label program. Looking at the labeling coordinate file, it fits the YOLOv5 model as below.

Figure 7. Label txt file

Total number of Image dataset : 5,546

Total number of labeling dataset : 5,546

2.2 Split Train and Validation set

Create a datasets folder at the same location as the yolov5-master folder.

Train image dataset path : datasets > bakery > images > train

Train label dataset path : datasets > bakery > labels> train

Val image dataset path : datasets > bakery > images > val

Val label dataset path : datasets > bakery > labels> val
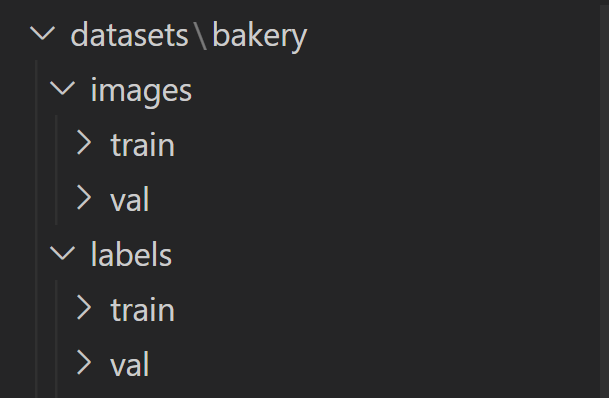
Figure 8. Datasets path

2.3 create customized yaml file

create new bakery.yaml file. (path : ./data)
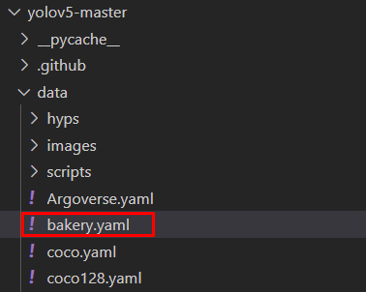
Figure 9. yaml file path

check the train and val path as follow.

path: ../datasets/bakery  # dataset root dir
train: images/train  # train images (relative to 'path')
val: images/val  # val images (relative to 'path')
test:  # test images (optional)

# Classes
nc: 6  # number of classes
names: ['apple tart', 'croissant','car','bagel', 'white donut', 'pretzel']  # class names

2.4 Model Training

python train.py --img 640 --batch 4 --epochs 10--data ./data/bakery.yaml --weights yolov5l.pt

When you start training, you must select img size, batch size, epochs, and model. Make sure that the bakery.yaml path is correct based on the current path running the above code. In addition, the model of yolov5 must be selected, and it can be selected from four types: s,m,l,x, and yolov5l model was used for this training. Finally, it is also important to determine the batch size. The batch size must be selected according to GPU or CPU performance, and a "cuda out of memory" error will occur if the batch size is set too large. Training is possible while gradually reducing the batch size. If the epoch is set very large, there is a risk of overfitting, and if the epoch is set low, it may become underfitting. Trial and error is required for optimal model training.

The Figure 10 below is an output window when only epoch 1 is executed. Train results and weight.pt files can be found in runs/train/exp (number).
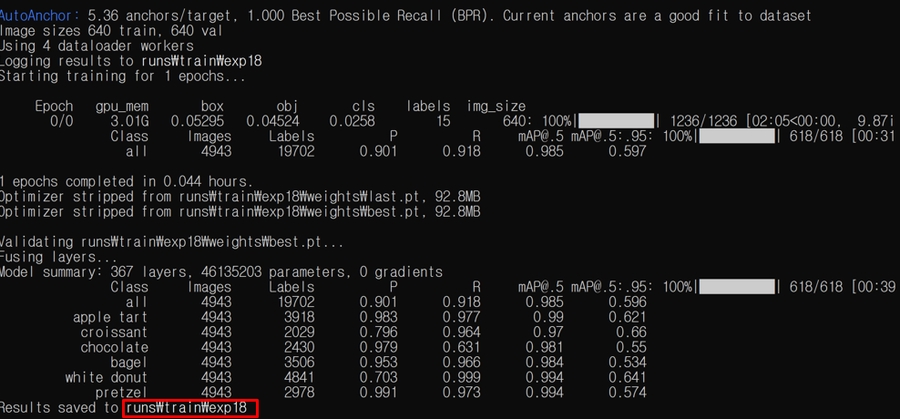
Figure 10. Model Training

2.5 Using Trained Weight.pt

When you proceed with model training, there are best.pt and last.pt in the file. The best.pt file is a model weight file that has the optimal training parameter weight. last.pt is the final model weight file when all training is done. If we set a lot of epochs, we used the most optimal best.pt because it could be overfitting at the end of training.

It can be seen that the weights file is generated in the runs/train/exp(number) path.
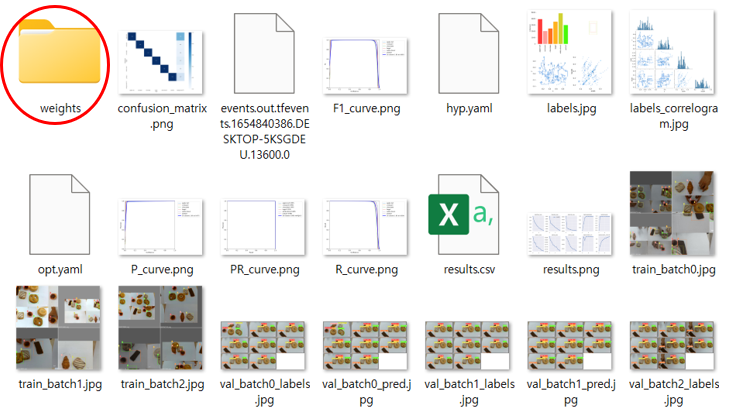
Figure 11. Trained weight file

We changed the best.pt file name to bakery.pt.

bakery.py file path : /yolov5-master

You can test through the weight.pt file trained through the code below.

python detect.py --weights bakery.pt --img 640 --conf 0.25 --source Test_1.mp4 #test video
python detect.py --weights bakery.pt --img 640 --conf 0.25 --source 1 #test with your own webcam

Figure 12. Test

3. Algorithm

The algorithm has three main sections. Whole process of program algorithm as follows.

  1. pre-processing

    • Rounding Tray

  2. post-processing

    • Image Capture

    • Filtering Out of tray

    • Auto-calculation

  3. Application

    • KAKAOPAY QR Code

    • Image Concatenation

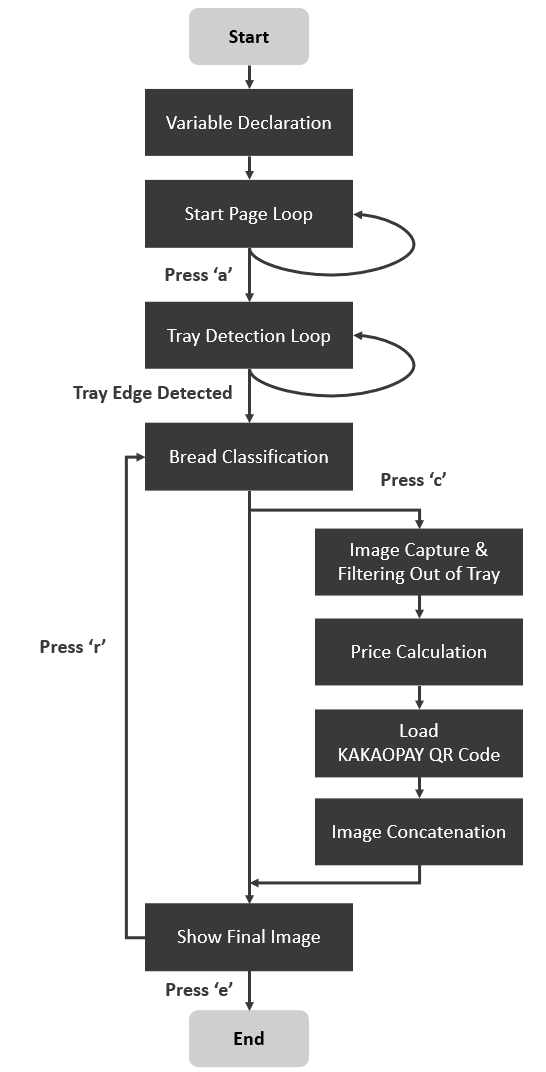
  • Flowchart

Figure 13. Flowchart

3.1 Pre-processing

Rounding Tray

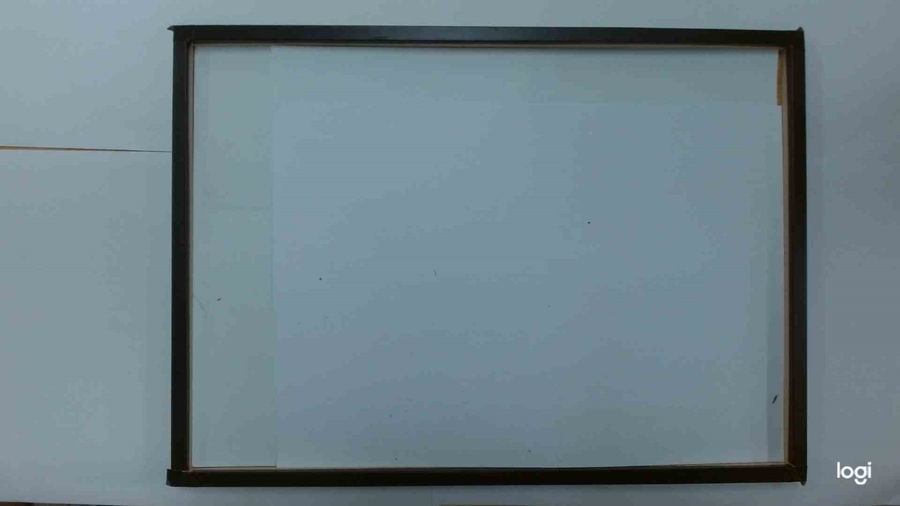
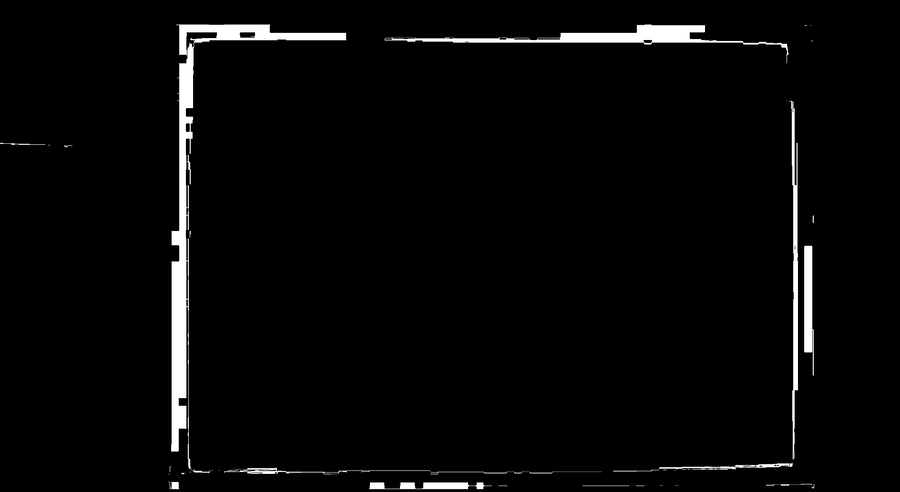
The ROI area required for object detection should be set. First, find the four vertices of the rounding tray and draw a square to determine if an object exists in the square. For this algorithm, the openvInrange function and the HoughlineP function were used. Since the original image used is a BGR scale, the surrounding tray edge is extracted by first converting it to HSV and then adjusting Inrange to Hue, Saturation, and Value. Figure 14 (a) is an original frame image, and (b) is a result of converting to a binary image after Inrange processing. If firstFrame = 1 is the exact line of the tray, if not, repeat until firstFrame = 0 and extract the correct line. This is the tray detection loop represented in Figure 13. flowchart.

  • Rounding Tray using HoughlineP

# =======================================================
# =================== Tray Detection ====================
# =======================================================

if firstFrame == 1:

    hsv = cv2.cvtColor(im0, cv2.COLOR_BGR2HSV)

    # define range of a color in HSV
    lower_hue = np.array([0,0,0]) 
    upper_hue = np.array([50,50,100])

    # Threshold the HSV image to get only black colors
    mask = cv2.inRange(hsv, lower_hue, upper_hue)

    rho = 1
    theta = math.pi/180
    threshold = 25

    lines = cv2.HoughLinesP(mask, rho, theta, threshold, lines=None, minLineLength=20, 													maxLineGap=10)
    if lines is None:
        firstFrame -= 1
        continue

    else:
        trayDetected = 1
        
        startXs = []
        startYs = []
        endXs = []
        endYs = []

        for j in range(lines.shape[0]):

            startX = lines[j][0][0]
            startY = lines[j][0][1]
            endX = lines[j][0][2]
            endY = lines[j][0][3]

            startXs.append(startX)
            startYs.append(startY)
            endXs.append(endX)
            endYs.append(endY)

        minX = min(startXs)
        minY = min(startYs)
        maxX = max(endXs)
       	maxY = max(endYs)

Source Image (a)

After Inrange (b)

Figure 14. HoughLinesP

Finally, the HoughLinesP is adjusted to extract the line in the Inrange. Several lines are detected through HoughLineP, and we found and used the maximum, minimum x, and y values of all extracted straight lines because only the edge of the tray should be represented by one box. Therefore, the results are as follows.
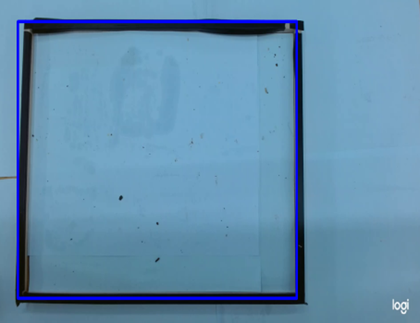
Figure 15. Tray detection

3.2 post-processing

Image Capture

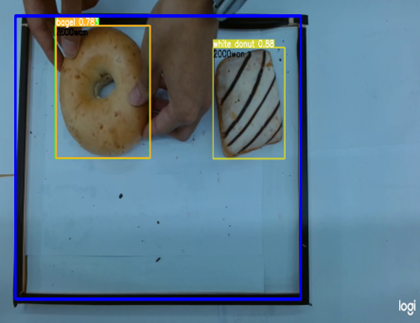
The first process of post-processing is image capture. When the 'c' key is pressed, the current frame is captured and object detection is performed on the frame. Since the frame image at the moment of capture is continuously stored, pressing the 'c' key continuously uses the stored image. When 'r' is pressed, the captured frame is initialized back into the current frame. Figure 16 is the result of object detection when the 'c' key is input.
 for path, im, im0s, vid_cap, s in dataset:
        # ===================================================
        # ================== Initialization =================
        # ===================================================
        breadCls = []
        boxPos = []
        totalPrice = 0
        # ===================================================
        # =================== Key Pressed ===================
        # ===================================================
        key = cv2.waitKey(100)
        if key == ord('c'):     # image capturing
            isCapture = 1
            isScan = 0
            isCal = 1

        elif key == ord('r'):   # Back to normal state
            isCapture = 0
            isScan = 0
            isCal = 0
            isFix = 0

        if isCapture == 0 :
            prepath     = path
            preim       = im
            preim0s     = im0s
            previd_cap  = vid_cap

        else:
            path = prepath
            im = preim
            im0s = preim0s
            vid_cap = previd_cap

Figure 16. Image Capture

Filtering Out of tray

We performed the out of tray filtering process for accurate calculation. We performed filtering using the center coordinates of the object detection rounding box. If the central coordinate of the bounding box was within the tray edge area, it was determined as inside, and if it existed outside, it was determined as outside. In Figure 17, objects existing outside the rounding tray are represented by a red binding box. Rounding Tray is a post-processing process that assumes a cash register where a real customer puts things up, and does not calculate objects that exist outside the cash register.

if isCal == 1:
    if trayDetected:
       	    # Object : Inside Tray
            if centerX >= minX and centerX <= maxX and centerY >= minY and centerY <= maxY:
                annotator.box_label(xyxy, label, color=_color)
                priceText = str(breadPrice[c]) + 'won'
                COLOR_PRICE = COLOR_BLACK

                breadCls.append(c)
                totalPrice += breadPrice[c]

                # Object : Out of Tray
            else:
                priceText = 'Out of range'
                COLOR_PRICE = COLOR_RED
                outRangePos.append([topLeftX, topLeftY, bottomRightX, bottomRightY])

                cv2.putText(im0, priceText, org, font, 1, COLOR_PRICE, 2)

Figure 17. Filtering result

Auto-calculation

If you have distinguished the bread in the Rounding Tray after the Out of Tray filtering process, calculate the total price for the bread only. The class name existing for each frame may be returned as int(cls) in integer. Therefore, we sum the prices for all objects corresponding to the class number specified in advance.

for *xyxy, conf, cls in reversed(det):
        if save_txt:  # Write to file
            xywh = (xyxy2xywh(torch.tensor(xyxy).view(1, 4)) / gn).view(-1).tolist()  # normalized xywh
            line = (cls, *xywh, conf) if save_conf else (cls, *xywh)  # label format
            with open(f'{txt_path}.txt', 'a') as f:
                f.write(('%g ' * len(line)).rstrip() % line + '\n')

        if save_img or save_crop or view_img :  # Add bbox to image when Calculation Mode
           xywh = (xyxy2xywh(torch.tensor(xyxy).view(1, 4))).view(-1).tolist()  # xywh
           c = int(cls)  # integer class
           label = None if hide_labels else (names[c] if hide_conf else f'{names[c]} {conf:.2f}')
           _color = colors(c, True)

If you have learned by adding more kinds of bread, you can add the class number and price to the list below.

Figure18. Class list

3.3 Application

We added display elements in consideration of actual commercial applications. Total price according to the total price was output, and Kakao Pay QR code was output so that actual consumers could pay. Figure 19 is the final result of combining three images: webcam image, qr code, and price. Looking at Figure 19, the total price was set at 7,800 won. This is a price measurement for only three objects in the Rounding Tray, and it can be seen that bread outside the Rounding Tray in red is not included in the total price price. Also, for bread with Inside Rounding Tray, the price is marked for each object.
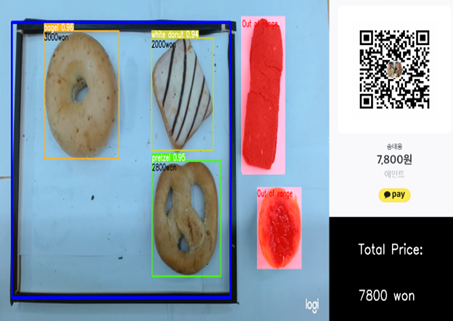
Figure 19. Application Display

3.4 Customized detect.py

This is the final customized detect.py file.

# YOLOv5 🚀 by Ultralytics, GPL-3.0 license
"""
Run inference on images, videos, directories, streams, etc.

Usage - sources:
    $ python path/to/detect.py --weights yolov5s.pt --source 0              # webcam
                                                             img.jpg        # image
                                                             vid.mp4        # video
                                                             path/          # directory
                                                             path/*.jpg     # glob
                                                             'https://youtu.be/Zgi9g1ksQHc'  # YouTube
                                                             'rtsp://example.com/media.mp4'  # RTSP, RTMP, HTTP stream

Usage - formats:
    $ python path/to/detect.py --weights yolov5s.pt                 # PyTorch
                                         yolov5s.torchscript        # TorchScript
                                         yolov5s.onnx               # ONNX Runtime or OpenCV DNN with --dnn
                                         yolov5s.xml                # OpenVINO
                                         yolov5s.engine             # TensorRT
                                         yolov5s.mlmodel            # CoreML (macOS-only)
                                         yolov5s_saved_model        # TensorFlow SavedModel
                                         yolov5s.pb                 # TensorFlow GraphDef
                                         yolov5s.tflite             # TensorFlow Lite
                                         yolov5s_edgetpu.tflite     # TensorFlow Edge TPU
"""

import argparse
# from curses import COLOR_BLACK
import os
import sys
from pathlib import Path

import torch
import torch.backends.cudnn as cudnn

FILE = Path(__file__).resolve()
ROOT = FILE.parents[0]  # YOLOv5 root directory
if str(ROOT) not in sys.path:
    sys.path.append(str(ROOT))  # add ROOT to PATH
ROOT = Path(os.path.relpath(ROOT, Path.cwd()))  # relative

from models.common import DetectMultiBackend
from utils.dataloaders import IMG_FORMATS, VID_FORMATS, LoadImages, LoadStreams
from utils.general import (LOGGER, check_file, check_img_size, check_imshow, check_requirements, colorstr, cv2,
                           increment_path, non_max_suppression, print_args, scale_coords, strip_optimizer, xyxy2xywh)
from utils.plots import Annotator, colors, save_one_box
from utils.torch_utils import select_device, time_sync

import math
from operator import imod
import numpy as np
from itertools import *

@torch.no_grad()
def run(
        weights=ROOT / 'yolov5s.pt',  # model.pt path(s)
        source=ROOT / 'data/images',  # file/dir/URL/glob, 0 for webcam
        data=ROOT / 'data/coco128.yaml',  # dataset.yaml path
        imgsz=(640, 640),  # inference size (height, width)
        conf_thres=0.25,  # confidence threshold
        iou_thres=0.45,  # NMS IOU threshold
        max_det=1000,  # maximum detections per image
        device='',  # cuda device, i.e. 0 or 0,1,2,3 or cpu
        view_img=False,  # show results
        save_txt=False,  # save results to *.txt
        save_conf=False,  # save confidences in --save-txt labels
        save_crop=False,  # save cropped prediction boxes
        nosave=False,  # do not save images/videos
        classes=None,  # filter by class: --class 0, or --class 0 2 3
        agnostic_nms=False,  # class-agnostic NMS
        augment=False,  # augmented inference
        visualize=False,  # visualize features
        update=False,  # update all models
        project=ROOT / 'runs/detect',  # save results to project/name
        name='exp',  # save results to project/name
        exist_ok=False,  # existing project/name ok, do not increment
        line_thickness=3,  # bounding box thickness (pixels)
        hide_labels=False,  # hide labels
        hide_conf=False,  # hide confidences
        half=False,  # use FP16 half-precision inference
        dnn=False,  # use OpenCV DNN for ONNX inference
):

    # Image Loading
    startImg = cv2.imread('./images/startpage.png', 1)      #cv2.IMREAD_COLOR
    captureImg = cv2.imread('./images/capturepage.png', 1)  #cv2.IMREAD_COLOR
    scanImg = cv2.imread('./images/scanpage.png', 1)        #cv2.IMREAD_COLOR

    # Font
    font = cv2.FONT_HERSHEY_SIMPLEX

    # Color 
    COLOR_RED = (0, 0, 255)
    COLOR_WHITE = (255, 255, 255)
    COLOR_BLACK = (0, 0, 0)
    COLOR_BLUE = (255, 0, 0)
    COLOR_PRICE = (0, 0, 0)

    # Class & Bounding box Position
    breadCls = []
    totalPrice = 0

    # Bounding Box Information
    outRangePos = []
    numOutRange = 0

    # Tray Detection
    firstFrame = 0

    minX = 0
    minY = 0
    maxX = 0
    maxY = 0
    trayDetected = 0

    # Capturing variables
    isCapture = 0
    isScan = 0
    isCal = 0
    isFix = 0

    # For fixing bounding boxes in Calculation Mode
    predet = 0

    prepath     = 0
    preim       = 0
    preim0s     = 0
    previd_cap  = 0

    breadKinds = ['Apple Tart',  'Croissant',      'Chocolate',   'Bagel',     'White Donut',    'Pretzel']
    breadPrice = [2700,           1200,             1500,          3000,        2000,             2800]

    # Combination
    classes = [0, 1, 2, 3, 4, 5]
    allCases = []
    for j in range(len(classes)):
        partCases = list(combinations(classes, j+1))
        allCases += partCases
    
    source = str(source)
    save_img = not nosave and not source.endswith('.txt')  # save inference images
    is_file = Path(source).suffix[1:] in (IMG_FORMATS + VID_FORMATS)
    is_url = source.lower().startswith(('rtsp://', 'rtmp://', 'http://', 'https://'))
    webcam = source.isnumeric() or source.endswith('.txt') or (is_url and not is_file)

    if is_url and is_file:
        source = check_file(source)  # download

    # Directories
    save_dir = increment_path(Path(project) / name, exist_ok=exist_ok)  # increment run
    (save_dir / 'labels' if save_txt else save_dir).mkdir(parents=True, exist_ok=True)  # make dir

    # Load model
    device = select_device(device)
    model = DetectMultiBackend(weights, device=device, dnn=dnn, data=data, fp16=half)
    stride, names, pt = model.stride, model.names, model.pt
    imgsz = check_img_size(imgsz, s=stride)  # check image size

    # Dataloader
    if webcam:
        view_img = check_imshow()
        cudnn.benchmark = True  # set True to speed up constant image size inference
        dataset = LoadStreams(source, img_size=imgsz, stride=stride, auto=pt)
        bs = len(dataset)  # batch_size
    else:
        dataset = LoadImages(source, img_size=imgsz, stride=stride, auto=pt)
        bs = 1  # batch_size
    vid_path, vid_writer = [None] * bs, [None] * bs

    
    # Run inference
    model.warmup(imgsz=(1 if pt else bs, 3, *imgsz))  # warmup
    dt, seen = [0.0, 0.0, 0.0], 0

    # ===================================================
    # =================== Start Page ====================
    # ===================================================
    
    while True:
        startImg = cv2.resize(startImg,(1280,720))
        cv2.imshow("Bread Auto-Calculator", startImg)
        key = cv2.waitKey(100)
        if key == ord('a'):
            break        

    for path, im, im0s, vid_cap, s in dataset:

        # ===================================================
        # ================== Initialization =================
        # ===================================================
        breadCls = []
        totalPrice = 0

        # ===================================================
        # =================== Key Pressed ===================
        # ===================================================
        key = cv2.waitKey(100)
        if key == ord('c'):     # image capturing
            isCapture = 1
            isScan = 0
            isCal = 1

        elif key == ord('r'):   # Back to normal state
            isCapture = 0
            isScan = 0
            isCal = 0
            isFix = 0

        if isCapture == 0 :
            prepath     = path
            preim       = im
            preim0s     = im0s
            previd_cap  = vid_cap

        else:
            path = prepath
            im = preim
            im0s = preim0s
            vid_cap = previd_cap

        t1 = time_sync()
        im = torch.from_numpy(im).to(device)
        im = im.half() if model.fp16 else im.float()  # uint8 to fp16/32
        im /= 255  # 0 - 255 to 0.0 - 1.0
        if len(im.shape) == 3:
            im = im[None]  # expand for batch dim
        t2 = time_sync()
        dt[0] += t2 - t1

        # Inference
        visualize = increment_path(save_dir / Path(path).stem, mkdir=True) if visualize else False
        pred = model(im, augment=augment, visualize=visualize)
        t3 = time_sync()
        dt[1] += t3 - t2

        # NMS
        pred = non_max_suppression(pred, conf_thres, iou_thres, classes, agnostic_nms, max_det=max_det)
        dt[2] += time_sync() - t3

        # Second-stage classifier (optional)
        # pred = utils.general.apply_classifier(pred, classifier_model, im, im0s)

        # Process predictions
        breadCls = []
        for i, det in enumerate(pred):  # per image
            seen += 1

            if webcam:  # batch_size >= 1
                p, im0, frame = path[i], im0s[i].copy(), dataset.count
                s += f'{i}: '
            else:
                p, im0, frame = path, im0s.copy(), getattr(dataset, 'frame', 0)

            p = Path(p)  # to Path
            save_path = str(save_dir / p.name)  # im.jpg
            txt_path = str(save_dir / 'labels' / p.stem) + ('' if dataset.mode == 'image' else f'_{frame}')  # im.txt
            s += '%gx%g ' % im.shape[2:]  # print string
            gn = torch.tensor(im0.shape)[[1, 0, 1, 0]]  # normalization gain whwh
            imc = im0.copy() if save_crop else im0  # for save_crop
            annotator = Annotator(im0, line_width=line_thickness, example=str(names))

            firstFrame += 1
            if firstFrame == 1:

                # ======================================
                # =========== Tray Detection ===========
                # ======================================

                hsv = cv2.cvtColor(im0, cv2.COLOR_BGR2HSV)

                # define range of a color in HSV
                lower_hue = np.array([0,0,0]) 
                upper_hue = np.array([50,50,100])
                
                # Threshold the HSV image to get only black colors
                mask = cv2.inRange(hsv, lower_hue, upper_hue)

                rho = 1
                theta = math.pi/180
                threshold = 25

                lines = cv2.HoughLinesP(mask, rho, theta, threshold, lines=None, minLineLength=20, maxLineGap=10)
                if lines is None:
                    firstFrame -= 1
                    continue

                else:
                    trayDetected = 1

                    startXs = []
                    startYs = []
                    endXs = []
                    endYs = []

                    for j in range(lines.shape[0]):
                        
                        startX = lines[j][0][0]
                        startY = lines[j][0][1]
                        endX = lines[j][0][2]
                        endY = lines[j][0][3]

                        startXs.append(startX)
                        startYs.append(startY)
                        endXs.append(endX)
                        endYs.append(endY)

                    minX = min(startXs)
                    minY = min(startYs)
                    maxX = max(endXs)
                    maxY = max(endYs)
            
            if len(det):

                # Rescale boxes from img_size to im0 size
                det[:, :4] = scale_coords(im.shape[2:], det[:, :4], im0.shape).round()

                # Print results
                for c in det[:, -1].unique():
                    n = (det[:, -1] == c).sum()  # detections per class
                    s += f"{n} {names[int(c)]}{'s' * (n > 1)}, "  # add to string

                # Write results
                if isFix == 1:
                    det = predet

                for *xyxy, conf, cls in reversed(det):
            
                    if save_txt:  # Write to file
                        xywh = (xyxy2xywh(torch.tensor(xyxy).view(1, 4)) / gn).view(-1).tolist()  # normalized xywh
                        line = (cls, *xywh, conf) if save_conf else (cls, *xywh)  # label format
                        with open(f'{txt_path}.txt', 'a') as f:
                            f.write(('%g ' * len(line)).rstrip() % line + '\n')

                    if save_img or save_crop or view_img :  # Add bbox to image when Calculation Mode
                        xywh = (xyxy2xywh(torch.tensor(xyxy).view(1, 4))).view(-1).tolist()  # xywh
                        c = int(cls)  # integer class
                        label = None if hide_labels else (names[c] if hide_conf else f'{names[c]} {conf:.2f}')
                        _color = colors(c, True)

                        centerX = int(xywh[0])
                        centerY = int(xywh[1])

                        topLeftX = int(xyxy[0])
                        topLeftY = int(xyxy[1])
                        bottomRightX = int(xyxy[2])
                        bottomRightY = int(xyxy[3])

                        org =(topLeftX, topLeftY+30)
                        
                        if isCal == 1:
                             if trayDetected:
                                 
                                # Object : Inside Tray
                                if centerX >= minX and centerX <= maxX and centerY >= minY and centerY <= maxY:
                                    annotator.box_label(xyxy, label, color=_color)
                                    print(f"breadclass = {c}")
                                    print(f"breadPrice = {str(breadPrice[c])}")
                                    priceText = str(breadPrice[c]) + 'won'
                                    COLOR_PRICE = COLOR_BLACK

                                    breadCls.append(c)
                                    totalPrice += breadPrice[c]

                                # Object : Out of Tray
                                else:
                                    priceText = 'Out of range'
                                    COLOR_PRICE = COLOR_RED
                                    outRangePos.append([topLeftX, topLeftY, bottomRightX, bottomRightY])
                                    
                                cv2.putText(im0, priceText, org, font, 1, COLOR_PRICE, 2)

                    if save_crop:
                        save_one_box(xyxy, imc, file=save_dir / 'crops' / names[c] / f'{p.stem}.jpg', BGR=True)
                
                predet = det

            # Stream results
            im0 = annotator.result()
            if view_img:
                cv2.imshow(str(p), im0)
                cv2.waitKey(1)  # 1 millisecond

            # width = im0.shape[1]
            # height = im0.shape[0]

            mask = np.zeros_like(im0)
            numOutRange = len(outRangePos)
            if isCal:

                if len(breadCls): 
                    for j in range(numOutRange):
                        vertices_line = np.array([[outRangePos[j][0], outRangePos[j][1]],[outRangePos[j][2], outRangePos[j][1]],[outRangePos[j][2], outRangePos[j][3]],[outRangePos[j][0], outRangePos[j][3]]], dtype=np.int32)
                        cv2.fillPoly(mask, [vertices_line], COLOR_RED)
                    im0 = cv2.addWeighted(im0, 1, mask, 0.7, 0)

                    qrcode = cv2.imread('./images/qrprice/' + str(totalPrice) + '.jpg', 1) # cv2.IMREAD_COLOR
                    qrcode = cv2.resize(qrcode,(360,480))

                else:
                    qrcode = cv2.imread('./images/qrprice/' + 'nobread' + '.png', 1) # cv2.IMREAD_COLOR
                    qrcode = cv2.resize(qrcode,(360,480))

                mask = cv2.resize(qrcode,(360,240))
                mask = np.zeros_like(mask)    
                im0 = cv2.resize(im0,(920,720))

                addv = cv2.vconcat([qrcode, mask])
                im0 = cv2.hconcat([im0,addv])

                frameText = "Total Price:"
                priceText = str(totalPrice) + ' won'

                org1 =(int(1000), int(560))
                org2 =(int(1000), int(660))
                cv2.putText(im0, frameText, org1, font, 1, COLOR_WHITE, 2)   
                cv2.putText(im0, priceText, org2, font, 1, COLOR_WHITE, 2)

                # Showing All Bread Price
                org = (750, 60)
                frameText = '[' + 'Price Tag' +']'
                cv2.putText(im0, frameText, org, font, 0.6, COLOR_BLACK, 2)

                for j in range(6):
                    org = (750, int(100 + 40*j))
                    frameText = breadKinds[j] + ': ' + str(breadPrice[j])
                    cv2.putText(im0, frameText, org, font, 0.5, COLOR_BLACK, 1)

                cv2.imshow('Bread Auto-Calculator', im0)

            # Total Result
            else:
                im0 = cv2.resize(im0,(920,720))
                if isCapture == 0 and isScan == 0:
                    im0 = cv2.hconcat([im0, captureImg])
                elif isScan == 1:
                    im0 = cv2.hconcat([im0, scanImg])

                # Showing All Bread Price
                org = (750, 60)
                frameText = '[' + 'Price Tag' +']'
                cv2.putText(im0, frameText, org, font, 0.6, COLOR_BLACK, 2)

                for j in range(6):
                    org = (750, int(100 + 40*j))
                    frameText = breadKinds[j] + ': ' + str(breadPrice[j])
                    cv2.putText(im0, frameText, org, font, 0.5, COLOR_BLACK, 1)

                cv2.imshow('Bread Auto-Calculator', im0)       

            # Save results (image with detections)
            if save_img:
                if dataset.mode == 'image':
                    cv2.imwrite(save_path, im0)
                else:  # 'video' or 'stream'
                    if vid_path[i] != save_path:  # new video
                        vid_path[i] = save_path
                        if isinstance(vid_writer[i], cv2.VideoWriter):
                            vid_writer[i].release()  # release previous video writer
                        if vid_cap:  # video
                            fps = vid_cap.get(cv2.CAP_PROP_FPS)
                            w = int(vid_cap.get(cv2.CAP_PROP_FRAME_WIDTH))
                            h = int(vid_cap.get(cv2.CAP_PROP_FRAME_HEIGHT))
                        else:  # stream
                            fps, w, h = 30, im0.shape[1], im0.shape[0]
                        save_path = str(Path(save_path).with_suffix('.mp4'))  # force *.mp4 suffix on results videos
                        vid_writer[i] = cv2.VideoWriter(save_path, cv2.VideoWriter_fourcc(*'mp4v'), fps, (w, h))
                    vid_writer[i].write(im0)
        
        # Print time (inference-only)
        LOGGER.info(f'{s}Done. ({t3 - t2:.3f}s)')

    # Print results
    t = tuple(x / seen * 1E3 for x in dt)  # speeds per image
    LOGGER.info(f'Speed: %.1fms pre-process, %.1fms inference, %.1fms NMS per image at shape {(1, 3, *imgsz)}' % t)
    if save_txt or save_img:
        s = f"\n{len(list(save_dir.glob('labels/*.txt')))} labels saved to {save_dir / 'labels'}" if save_txt else ''
        LOGGER.info(f"Results saved to {colorstr('bold', save_dir)}{s}")
    if update:
        strip_optimizer(weights)  # update model (to fix SourceChangeWarning)


def parse_opt():
    parser = argparse.ArgumentParser()
    parser.add_argument('--weights', nargs='+', type=str, default=ROOT / 'yolov5s.pt', help='model path(s)')
    parser.add_argument('--source', type=str, default=ROOT / 'data/images', help='file/dir/URL/glob, 0 for webcam')
    parser.add_argument('--data', type=str, default=ROOT / 'data/coco128.yaml', help='(optional) dataset.yaml path')
    parser.add_argument('--imgsz', '--img', '--img-size', nargs='+', type=int, default=[640], help='inference size h,w')
    parser.add_argument('--conf-thres', type=float, default=0.25, help='confidence threshold')
    parser.add_argument('--iou-thres', type=float, default=0.45, help='NMS IoU threshold')
    parser.add_argument('--max-det', type=int, default=1000, help='maximum detections per image')
    parser.add_argument('--device', default='', help='cuda device, i.e. 0 or 0,1,2,3 or cpu')
    parser.add_argument('--view-img', action='store_true', help='show results')
    parser.add_argument('--save-txt', action='store_true', help='save results to *.txt')
    parser.add_argument('--save-conf', action='store_true', help='save confidences in --save-txt labels')
    parser.add_argument('--save-crop', action='store_true', help='save cropped prediction boxes')
    parser.add_argument('--nosave', action='store_true', help='do not save images/videos')
    parser.add_argument('--classes', nargs='+', type=int, help='filter by class: --classes 0, or --classes 0 2 3')
    parser.add_argument('--agnostic-nms', action='store_true', help='class-agnostic NMS')
    parser.add_argument('--augment', action='store_true', help='augmented inference')
    parser.add_argument('--visualize', action='store_true', help='visualize features')
    parser.add_argument('--update', action='store_true', help='update all models')
    parser.add_argument('--project', default=ROOT / 'runs/detect', help='save results to project/name')
    parser.add_argument('--name', default='exp', help='save results to project/name')
    parser.add_argument('--exist-ok', action='store_true', help='existing project/name ok, do not increment')
    parser.add_argument('--line-thickness', default=3, type=int, help='bounding box thickness (pixels)')
    parser.add_argument('--hide-labels', default=False, action='store_true', help='hide labels')
    parser.add_argument('--hide-conf', default=False, action='store_true', help='hide confidences')
    parser.add_argument('--half', action='store_true', help='use FP16 half-precision inference')
    parser.add_argument('--dnn', action='store_true', help='use OpenCV DNN for ONNX inference')
    opt = parser.parse_args()
    opt.imgsz *= 2 if len(opt.imgsz) == 1 else 1  # expand
    print_args(vars(opt))
    return opt


def main(opt):
    check_requirements(exclude=('tensorboard', 'thop'))
    run(**vars(opt))


if __name__ == "__main__":
    opt = parse_opt()
    main(opt)

4. Evaluation

  • In this project, we learned customized datasets through the YOLOv5l model, and the training performance was very good. As can be seen from the reproduction rate and precision graph shown below, model training shows very high values. The training evaluation was performed through the test video image, and (valid results) came out somehow. As the most important goal of this project was to recognize bread in real time and enable calculation, we achieved as much as expected in terms of speed and accuracy. Therefore, it was possible to implement a fast and accurate model through a low-cost webcam and GPU.

    Figure 20 is the result of val execution. Both Precision and Recall showed a high performance of 99%. Since training was performed using images, there is a possibility that more than a few frames have the same image. Therefore, since similar images may be validated, the precision and reproduction rate were higher than expected.

    Figure 20. Validation result

    Figure 22 is a graph showing F1-Score after validation. F1-Score is a value representing the harmonic mean of precision and reproducibility. Precision is the ratio of what the model classifies as true that is true. It is the ratio of predicting that the model is true among the actual true reproduction rates. Accurate classification is possible by increasing precision. However, the higher the precision, the lower the reproduction rate. Therefore, precision and reproducibility are in a trade-off relationship. Since we have to accurately classify and accurately predict actual bread, the harmonic mean, which can reasonably consider precision and reproducibility, was used as an evaluation criterion for basic model performance.

    Figure 21. Model Evaluation

    Looking at Figure 22, the confidence of all classes is maintained above 0.8. Therefore, it can be confirmed that the actual bread type was accurately classified.

Figure 22. F1-score of Model

  • However, there are some issues that need to be fixed. First of all, in this project, we learned bread without wrapping paper. If it is packaged, it is expected that there will be difficulties in training because it is difficult to distinguish the reflection of light or the exact model of bread. If you want to learn and classify bread with wrappers, it is considered important to learn cropping or rotation, and to different images from various angles in addition to the original image. In addition, there are various models for one bread type, but in this project, we learned about one bread type using only one bread. In order to apply the results of the project in the actual store, a post-processing process that can distinguish bread from similar models of the same kind as more data is needed.

  • In this project, users can pay through QR code images. In order to implement it as an actual payment system, it is necessary to introduce an additional computer system.

​

5. Run Test Video

Finally, if you have completed training the data, data preprocessing, and post-processing, you can check it through real-time images by executing the following code.

python detect.py --weights best_epoch_100.pt --img 640 --conf 0.25 --source 1

Reference

YOLOv5 : [Click here](ultralytics/yolov5: YOLOv5 🚀 in PyTorch > ONNX > CoreML > TFLite (github.com))

YOLOv5 installation : Click here

Appendix

Last updated