📚
DLIP
  • Introduction
  • Prerequisite
  • Image Processing Basics
    • Notes
      • Thresholding
      • Spatial Filtering
      • Masking with Bitwise Operation
      • Model n Calibration
    • Tutorial
      • Tutorial: Install OpenCV C++
      • Tutorial: Create OpenCV Project
      • Tutorial: C++ basics
      • Tutorial: OpenCV Basics
      • Tutorial: Image Watch for Debugging
      • Tutorial: Spatial Filter
      • Tutorial: Thresholding and Morphology
      • Tutorial: Camera Calibration
      • Tutorial: Color Image Processing
      • Tutorial: Edge Line Circle Detection
      • Tutorial: Corner Detection and Optical Flow
      • Tutorial: OpenCV C++ Cheatsheet
      • Tutorial: Installation for Py OpenCV
      • Tutorial: OpenCv (Python) Basics
    • LAB
      • Lab Report Template
      • Lab Report Grading Criteria
      • LAB Report Instruction
      • LAB: Grayscale Image Segmentation
        • LAB: Grayscale Image Segmentation -Gear
        • LAB: Grayscale Image Segmentation - Bolt and Nut
      • LAB: Color Image Segmentation
        • LAB: Facial Temperature Measurement with IR images
        • LAB: Magic Cloak
      • LAB: Straight Lane Detection and Departure Warning
      • LAB: Dimension Measurement with 2D camera
      • LAB: Tension Detection of Rolling Metal Sheet
  • Deep Learning for Perception
    • Notes
      • Lane Detection with Deep Learning
      • Overview of Deep Learning
        • Object Detection
        • Deep Learning Basics: Introduction
        • Deep Learning State of the Art
        • CNN, Object Detection
      • Perceptron
      • Activation Function
      • Optimization
      • Convolution
      • CNN Overview
      • Evaluation Metric
      • LossFunction Regularization
      • Bias vs Variance
      • BottleNeck Unit
      • Object Detection
      • DL Techniques
        • Technical Strategy by A.Ng
    • Tutorial - PyTorch
      • Tutorial: Install PyTorch
      • Tutorial: Python Numpy
      • Tutorial: PyTorch Tutorial List
      • Tutorial: PyTorch Example Code
      • Tutorial: Tensorboard in Pytorch
      • Tutorial: YOLO in PyTorch
        • Tutorial: Yolov8 in PyTorch
        • Tutorial: Train Yolo v8 with custom dataset
          • Tutorial: Train Yolo v5 with custom dataset
        • Tutorial: Yolov5 in Pytorch (VS code)
        • Tutorial: Yolov3 in Keras
    • LAB
      • Assignment: CNN Classification
      • Assignment: Object Detection
      • LAB: CNN Object Detection 1
      • LAB: CNN Object Detection 2
      • LAB Grading Criteria
    • Tutorial- Keras
      • Train Dataset
      • Train custom dataset
      • Test model
      • LeNet-5 Tutorial
      • AlexNet Tutorial
      • VGG Tutorial
      • ResNet Tutorial
    • Resource
      • Online Lecture
      • Programming tutorial
      • Books
      • Hardware
      • Dataset
      • Useful sites
  • Must Read Papers
    • AlexNet
    • VGG
    • ResNet
    • R-CNN, Fast-RCNN, Faster-RCNN
    • YOLOv1-3
    • Inception
    • MobileNet
    • SSD
    • ShuffleNet
    • Recent Methods
  • DLIP Project
    • Report Template
    • DLIP 2021 Projects
      • Digital Door Lock Control with Face Recognition
      • People Counting with YOLOv4 and DeepSORT
      • Eye Blinking Detection Alarm
      • Helmet-Detection Using YOLO-V5
      • Mask Detection using YOLOv5
      • Parking Space Management
      • Vehicle, Pedestrian Detection with IR Image
      • Drum Playing Detection
      • Turtle neck measurement program using OpenPose
    • DLIP 2022 Projects
      • BakeryCashier
      • Virtual Mouse
      • Sudoku Program with Hand gesture
      • Exercise Posture Assistance System
      • People Counting Embedded System
      • Turtle neck measurement program using OpenPose
    • DLIP Past Projects
  • Installation Guide
    • Installation Guide for Pytorch
      • Installation Guide 2021
    • Anaconda
    • CUDA cuDNN
      • CUDA 10.2
    • OpenCV
      • OpenCV Install and Setup
        • OpenCV 3.4.13 with VS2019
        • OpenCV3.4.7 VS2017
        • MacOS OpenCV C++ in XCode
      • Python OpenCV
      • MATLAB-OpenCV
    • Framework
      • Keras
      • TensorFlow
        • Cheat Sheet
        • Tutorial
      • PyTorch
    • IDE
      • Visual Studio Community
      • Google Codelab
      • Visual Studio Code
        • Python with VS Code
        • Notebook with VS Code
        • C++ with VS Code
      • Jupyter Notebook
        • Install
        • How to use
    • Ubuntu
      • Ubuntu 18.04 Installation
      • Ubuntu Installation using Docker in Win10
      • Ubuntu Troubleshooting
    • ROS
  • Programming
    • Python_Numpy
      • Python Tutorial - Tips
      • Python Tutorial - For Loop
      • Python Tutorial - List Tuple, Dic, Set
    • Markdown
      • Example: API documentation
    • Github
      • Create account
      • Tutorial: Github basic
      • Tutorial: Github Desktop
    • Keras
      • Tutorial Keras
      • Cheat Sheet
    • PyTorch
      • Cheat Sheet
      • Autograd in PyTorch
      • Simple ConvNet
      • MNIST using LeNet
      • Train ConvNet using CIFAR10
  • Resources
    • Useful Resources
    • Github
Powered by GitBook
On this page
  • C/C++ for Visual Studio Code
  • Steps
  • Step 1: Install C++ Extension in VS Code
  • Step 2: Install Compiler

Was this helpful?

  1. Installation Guide
  2. IDE
  3. Visual Studio Code

C++ with VS Code

PreviousNotebook with VS CodeNextJupyter Notebook

Last updated 1 year ago

Was this helpful?

C/C++ for Visual Studio Code

https://code.visualstudio.com/docs/languages/cpp

VS Code is an editor, NOT IDE. It does not have C++ compiler or debugger. You will need to install these tools or use those already installed on your computer.

For Window:

  • GCC, MSVC

  • MSVC is installed when Visual Studio Community is installed.

MacOS:

  • GCC, Clang

  • macOS users can get the tools with

Steps

  1. Install C++ Extension in VS Code

  2. Install Compiler (GCC)


Step 1: Install C++ Extension in VS Code

  1. Open VS Code.

  2. Select the Extensions view icon on the Activity bar or use the keyboard shortcut (Ctrl+Shift+X).

  3. Search for 'C++'.

  4. Select Install.

After you install the extension, when you open or create a *.cpp file, you will have syntax highlighting (colorization), smart completions and hovers (IntelliSense), and error checking.

Step 2: Install Compiler

Lets use GCC for this tutorial.

Check if you have a compiler installed

Make sure your compiler executable is in your platform path (%PATH on Windows, $PATH on Linux and macOS) so that the C/C++ extension can find it. You can check availability of your C++ tools by opening the Integrated Terminal (Ctrl+`) in VS Code and trying to directly run the compiler.

Checking for the GCC compiler g++:

g++ --version

Checking for the Clang compiler clang:

clang --version

Install MinGW-x64 for GCC

Take care to run each required Start menu and pacman command.

Open MSYS2 with terminal for the UCRT64 environment

Install mingw-w64 GCC by

pacman -S mingw-w64-ucrt-x86_64-gcc

You will need to install the full Mingw-w64 toolchain to get the gdb debugger.

pacman -S --needed base-devel mingw-w64-x86_64-toolchain

Then, select mingw-w64-x86_64-gbd

Add the MinGW compiler to your path

Add the path to your Mingw-w64 bin folder to the Windows PATH environment variable by using the following steps:

  1. In the Windows search bar, type 'settings (설정)' to open your Windows Settings.

  2. Search for Edit environment variables for your account. (계정의 환경 변수 편집)

  3. Choose the Path variable in your User variables and then select Edit.

  4. Select New and add the Mingw-w64 destination folder path: C:\msys64\mingw64\bin.

  5. Select OK to save the updated PATH. You will need to reopen any console windows for the new PATH location to be available.

To check your MinGW installation, open a new Command Prompt and type:

gcc --version

Test Code

We'll create the simplest Hello World C++ program.

Create a folder called "HelloWorld" and open VS Code in that folder (code . opens VS Code in the current folder):

mkdir HelloWorld
cd HelloWorld
code .

You can also open VS Code directly.

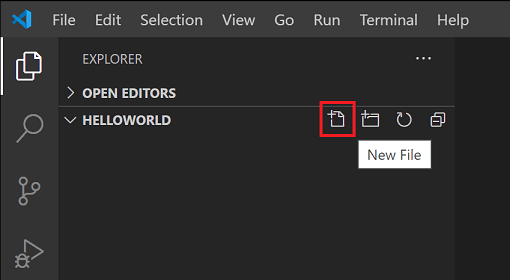
Now create a new file called helloworld.cpp with the New File button in the File Explorer or File > New File command.

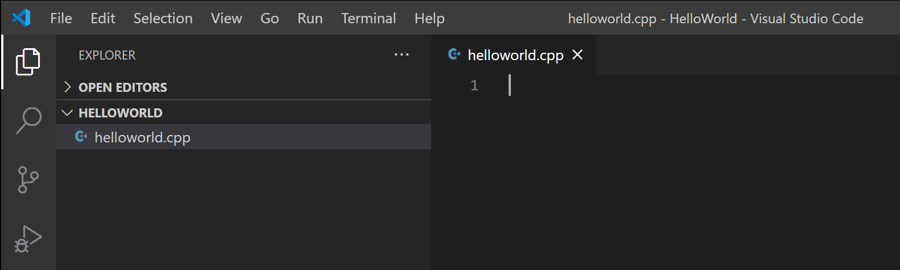
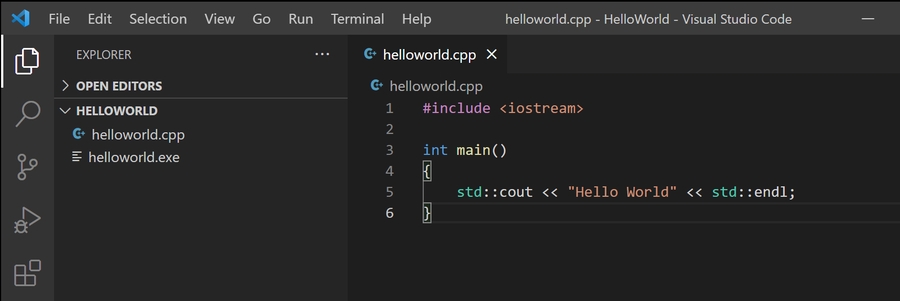
Now paste in this source code:

#include <iostream>

int main()
{
    std::cout << "Hello World" << std::endl;
}

Build Hello World

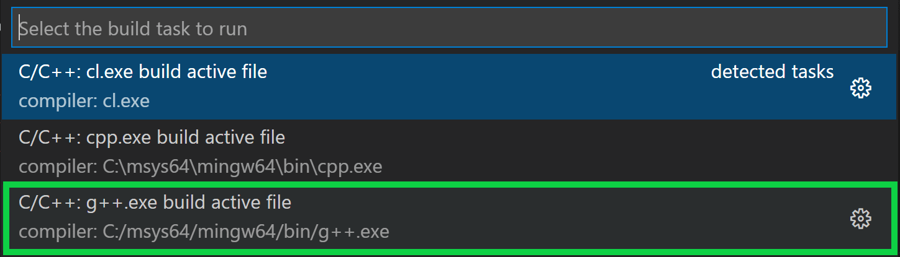
Now that we have a simple C++ program, let's build it. Select the Terminal > Run Build Task command (Ctrl+Shift+B) from the main menu.

Choose GCC toolset MinGW: C/C++: g++.exe build active file.

This will compile helloworld.cpp and create an executable file called helloworld.exe, which will appear in the File Explorer.

Run Hello World

VS Code Integrated Terminal, run your program by typing ".\helloworld".

You can also run by Ctrl+F5

If everything is set up correctly, you should see the output "Hello World".

Follow the Installation instructions on the to install Mingw-w64.

Accept the dialog by selecting Yes, I trust the authors

File Explorer New File button

Now press Ctrl+S to save the file. You can also enable to automatically save your file changes, by checking Auto Save in the main File menu.

Clang
Xcode
MSYS2 website
Workspace Trust
Auto Save
Search for c++ in the Extensions view
helloworld.cpp file
helloworld.exe in the File Explorer
Run Build Task menu option
Run hello world in the VS Code Integrated Terminal
Select g++.exe task