📚
DLIP
  • Introduction
  • Prerequisite
  • Image Processing Basics
    • Notes
      • Thresholding
      • Spatial Filtering
      • Masking with Bitwise Operation
      • Model n Calibration
    • Tutorial
      • Tutorial: Install OpenCV C++
      • Tutorial: Create OpenCV Project
      • Tutorial: C++ basics
      • Tutorial: OpenCV Basics
      • Tutorial: Image Watch for Debugging
      • Tutorial: Spatial Filter
      • Tutorial: Thresholding and Morphology
      • Tutorial: Camera Calibration
      • Tutorial: Color Image Processing
      • Tutorial: Edge Line Circle Detection
      • Tutorial: Corner Detection and Optical Flow
      • Tutorial: OpenCV C++ Cheatsheet
      • Tutorial: Installation for Py OpenCV
      • Tutorial: OpenCv (Python) Basics
    • LAB
      • Lab Report Template
      • Lab Report Grading Criteria
      • LAB Report Instruction
      • LAB: Grayscale Image Segmentation
        • LAB: Grayscale Image Segmentation -Gear
        • LAB: Grayscale Image Segmentation - Bolt and Nut
      • LAB: Color Image Segmentation
        • LAB: Facial Temperature Measurement with IR images
        • LAB: Magic Cloak
      • LAB: Straight Lane Detection and Departure Warning
      • LAB: Dimension Measurement with 2D camera
      • LAB: Tension Detection of Rolling Metal Sheet
  • Deep Learning for Perception
    • Notes
      • Lane Detection with Deep Learning
      • Overview of Deep Learning
        • Object Detection
        • Deep Learning Basics: Introduction
        • Deep Learning State of the Art
        • CNN, Object Detection
      • Perceptron
      • Activation Function
      • Optimization
      • Convolution
      • CNN Overview
      • Evaluation Metric
      • LossFunction Regularization
      • Bias vs Variance
      • BottleNeck Unit
      • Object Detection
      • DL Techniques
        • Technical Strategy by A.Ng
    • Tutorial - PyTorch
      • Tutorial: Install PyTorch
      • Tutorial: Python Numpy
      • Tutorial: PyTorch Tutorial List
      • Tutorial: PyTorch Example Code
      • Tutorial: Tensorboard in Pytorch
      • Tutorial: YOLO in PyTorch
        • Tutorial: Yolov8 in PyTorch
        • Tutorial: Train Yolo v8 with custom dataset
          • Tutorial: Train Yolo v5 with custom dataset
        • Tutorial: Yolov5 in Pytorch (VS code)
        • Tutorial: Yolov3 in Keras
    • LAB
      • Assignment: CNN Classification
      • Assignment: Object Detection
      • LAB: CNN Object Detection 1
      • LAB: CNN Object Detection 2
      • LAB Grading Criteria
    • Tutorial- Keras
      • Train Dataset
      • Train custom dataset
      • Test model
      • LeNet-5 Tutorial
      • AlexNet Tutorial
      • VGG Tutorial
      • ResNet Tutorial
    • Resource
      • Online Lecture
      • Programming tutorial
      • Books
      • Hardware
      • Dataset
      • Useful sites
  • Must Read Papers
    • AlexNet
    • VGG
    • ResNet
    • R-CNN, Fast-RCNN, Faster-RCNN
    • YOLOv1-3
    • Inception
    • MobileNet
    • SSD
    • ShuffleNet
    • Recent Methods
  • DLIP Project
    • Report Template
    • DLIP 2021 Projects
      • Digital Door Lock Control with Face Recognition
      • People Counting with YOLOv4 and DeepSORT
      • Eye Blinking Detection Alarm
      • Helmet-Detection Using YOLO-V5
      • Mask Detection using YOLOv5
      • Parking Space Management
      • Vehicle, Pedestrian Detection with IR Image
      • Drum Playing Detection
      • Turtle neck measurement program using OpenPose
    • DLIP 2022 Projects
      • BakeryCashier
      • Virtual Mouse
      • Sudoku Program with Hand gesture
      • Exercise Posture Assistance System
      • People Counting Embedded System
      • Turtle neck measurement program using OpenPose
    • DLIP Past Projects
  • Installation Guide
    • Installation Guide for Pytorch
      • Installation Guide 2021
    • Anaconda
    • CUDA cuDNN
      • CUDA 10.2
    • OpenCV
      • OpenCV Install and Setup
        • OpenCV 3.4.13 with VS2019
        • OpenCV3.4.7 VS2017
        • MacOS OpenCV C++ in XCode
      • Python OpenCV
      • MATLAB-OpenCV
    • Framework
      • Keras
      • TensorFlow
        • Cheat Sheet
        • Tutorial
      • PyTorch
    • IDE
      • Visual Studio Community
      • Google Codelab
      • Visual Studio Code
        • Python with VS Code
        • Notebook with VS Code
        • C++ with VS Code
      • Jupyter Notebook
        • Install
        • How to use
    • Ubuntu
      • Ubuntu 18.04 Installation
      • Ubuntu Installation using Docker in Win10
      • Ubuntu Troubleshooting
    • ROS
  • Programming
    • Python_Numpy
      • Python Tutorial - Tips
      • Python Tutorial - For Loop
      • Python Tutorial - List Tuple, Dic, Set
    • Markdown
      • Example: API documentation
    • Github
      • Create account
      • Tutorial: Github basic
      • Tutorial: Github Desktop
    • Keras
      • Tutorial Keras
      • Cheat Sheet
    • PyTorch
      • Cheat Sheet
      • Autograd in PyTorch
      • Simple ConvNet
      • MNIST using LeNet
      • Train ConvNet using CIFAR10
  • Resources
    • Useful Resources
    • Github
Powered by GitBook
On this page
  • Step 1. Install and Configure YOLO in local drive
  • Step 2. Prepare Custom Dataset
  • Download Dataset and Label
  • Visualize Train Dataset image with label
  • Step 3 — Split Dataset
  • Step 4. Training configuration file
  • Step 5. Running the train
  • Step 6. Test the model (Inference)
  • NEXT

Was this helpful?

  1. Deep Learning for Perception
  2. Tutorial - PyTorch
  3. Tutorial: YOLO in PyTorch
  4. Tutorial: Train Yolo v8 with custom dataset

Tutorial: Train Yolo v5 with custom dataset

PreviousTutorial: Train Yolo v8 with custom datasetNextTutorial: Yolov5 in Pytorch (VS code)

Last updated 11 months ago

Was this helpful?

This tutorial is about learning how to train YOLO v5 ~ v8 with a custom dataset of Mask-Dataset.

This Tutorial works for both YOLOv5 and YOLOv8

Step 1. Install and Configure YOLO in local drive

Step 2. Prepare Custom Dataset

Download Dataset and Label

We will use the to detect people wearing mask.

img

This annotation file has 4 lines being each one referring to one specific face in the image. Let’s check the first line:

0 0.8024193548387096 0.5887096774193549 0.1596774193548387 0.2557603686635945

The first integer number (0) is the object class id. For this dataset, the class id 0 refers to the class “using mask” and the class id 1 refers to the “without mask” class. The following float numbers are the xywh bounding box coordinates. As one can see, these coordinates are normalized to [0, 1].

  1. Create the folder /datasets in the same parent with the /yolov5 folder. You already have this folder if you have trained coco128 in previous tutorial.

  2. Under the directory /datasets , create a new folder for the MASK dataset. Then, copy the downloaded dataset under this folder. Example: /datasets/dataset_mask/archive/obj/

The dataset is indeed a bunch of images and respective annotation files:

Visualize Train Dataset image with label

import cv2

image_path = 'dataset_mask/archive/obj/2-with-mask'

image = cv2.imread(image_path + '.jpg')

class_list = ['using mask', 'without mask']
colors = [(0, 255, 0), (0, 255, 255)]

height, width, _ = image.shape

T=[]
with open(image_path + '.txt', "r") as file1:
    for line in file1.readlines():
        split = line.split(" ")

        # getting the class id
        class_id = int(split[0])
        color = colors[class_id]
        clazz = class_list[class_id]

        # getting the xywh bounding box coordinates
        x, y, w, h = float(split[1]), float(split[2]), float(split[3]), float(split[4])

        # re-scaling xywh to the image size
        box = [int((x - 0.5*w)* width), int((y - 0.5*h) * height), int(w*width), int(h*height)]
        cv2.rectangle(image, box, color, 2)
        cv2.rectangle(image, (box[0], box[1] - 20), (box[0] + box[2], box[1]), color, -1)
        cv2.putText(image, class_list[class_id], (box[0], box[1] - 5), cv2.FONT_HERSHEY_SIMPLEX, .5, (0,0,0))

cv2.imshow("output", image)
cv2.waitKey()

You will see this result

Step 3 — Split Dataset

The YOLOv5 training process will use the training subset to actually learn how to detect objects. The validation dataset is used to check the model performance during the training.

We need to split this data into two groups for training model: training and validation.

  • About 90% of the images will be copied to the folder /training/.

  • The remaining images (10% of the full data) will be saved in the folder /validation/.

For the inference dataset, you can use any images with people wearing mask.

  1. Under the directory datasets/ create the following python file split_data.py. Download [code here]https://github.com/ykkimhgu/DLIP-src/blob/main/Tutorial_Pytorch/split_data.py)

    • This code will save image files under the folder /images/ folder and label data under the folder /labels/

    • Under each folders, /training and /validation datasets will be splitted

import os, shutil, random

# preparing the folder structure

full_data_path = 'dataset_mask/archive/obj/'
extension_allowed = '.jpg'
split_percentage = 90

images_path = 'dataset_mask/images/'
if os.path.exists(images_path):
    shutil.rmtree(images_path)
os.mkdir(images_path)
    
labels_path = 'dataset_mask/labels/'
if os.path.exists(labels_path):
    shutil.rmtree(labels_path)
os.mkdir(labels_path)
    
training_images_path = images_path + 'training/'
validation_images_path = images_path + 'validation/'
training_labels_path = labels_path + 'training/'
validation_labels_path = labels_path +'validation/'
    
os.mkdir(training_images_path)
os.mkdir(validation_images_path)
os.mkdir(training_labels_path)
os.mkdir(validation_labels_path)

files = []

ext_len = len(extension_allowed)

for r, d, f in os.walk(full_data_path):
    for file in f:
        if file.endswith(extension_allowed):
            strip = file[0:len(file) - ext_len]      
            files.append(strip)

random.shuffle(files)

size = len(files)                   

split = int(split_percentage * size / 100)

print("copying training data")
for i in range(split):
    strip = files[i]
                         
    image_file = strip + extension_allowed
    src_image = full_data_path + image_file
    shutil.copy(src_image, training_images_path) 
                         
    annotation_file = strip + '.txt'
    src_label = full_data_path + annotation_file
    shutil.copy(src_label, training_labels_path) 

print("copying validation data")
for i in range(split, size):
    strip = files[i]
                         
    image_file = strip + extension_allowed
    src_image = full_data_path + image_file
    shutil.copy(src_image, validation_images_path) 
                         
    annotation_file = strip + '.txt'
    src_label = full_data_path + annotation_file
    shutil.copy(src_label, validation_labels_path) 

print("finished")
  1. Run the following script and check your folders

Step 4. Training configuration file

train: ../datasets/dataset_mask/images/training/
val: ../datasets/dataset_mask/images/validation/
# number of classes
nc: 2

# class names
names: ['with mask', 'without mask']

Step 5. Running the train

It is time to actually run the train:

python train.py --img 640 --batch 1 --epochs 2 --data maskdataset.yaml --weights yolov5s.pt

change bath number and epochs number for better training

Finally, in the end, we have the following output:

Now, confirm that you have a yolov5_ws/yolov5/runs/train/exp/weights/best.pt file:

Depending on the number of runs, it can be under /train/exp#/weights/best.pt, where #:number of exp

For my PC, it was exp3

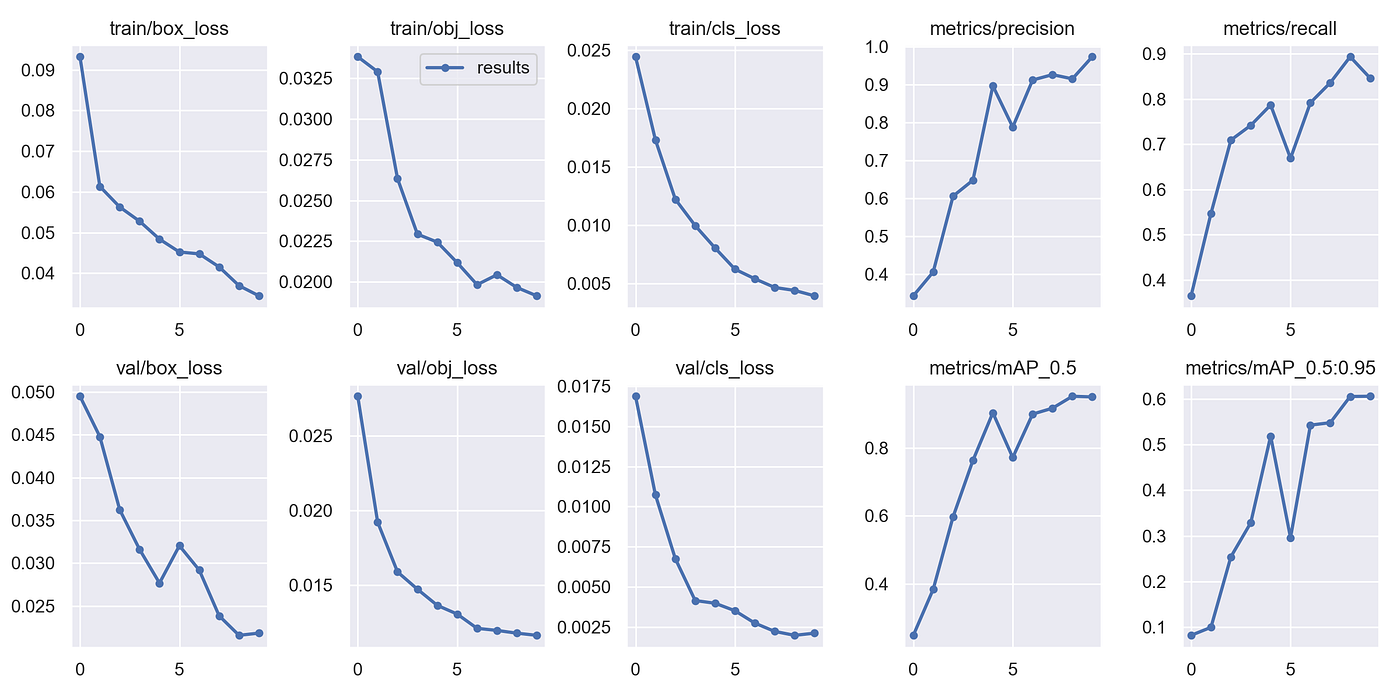
Also, check the output of runs/train/exp/results.png which demonstrates the model performance indicators during the training:
Step 6. Test the model (Inference)

Now we have our model trained with the Labeled Mask dataset, it is time to get some predictions. This can be easily done using an out-of-the-box YOLOv5 script specially designed for this:

Run the CLI

python detect.py --weights runs/train/exp/weights/best.pt --img 640 --conf 0.4 --source data/images/mask-teens.jpg

Your result image will be saved under runs/detect/exp

NEXT

Test trained YOLO with webcam

Download the dataset : .

img

Under the folder /datasets/ create the following python file ( visualizeLabel.py) to view images and labels. Download

The next step is creating a text file called maskdataset.yaml inside the yolov5 directory with the following content. Download

image

Download a and copy the file under the folder of yolov5/data/images

img
Labeled Mask YOLO
code here
code here
test image here
Follow Tutorial: Installation of Yolov8
Labeled Mask YOLO
image
image
image