📚
DLIP
  • Introduction
  • Prerequisite
  • Image Processing Basics
    • Notes
      • Thresholding
      • Spatial Filtering
      • Masking with Bitwise Operation
      • Model n Calibration
    • Tutorial
      • Tutorial: Install OpenCV C++
      • Tutorial: Create OpenCV Project
      • Tutorial: C++ basics
      • Tutorial: OpenCV Basics
      • Tutorial: Image Watch for Debugging
      • Tutorial: Spatial Filter
      • Tutorial: Thresholding and Morphology
      • Tutorial: Camera Calibration
      • Tutorial: Color Image Processing
      • Tutorial: Edge Line Circle Detection
      • Tutorial: Corner Detection and Optical Flow
      • Tutorial: OpenCV C++ Cheatsheet
      • Tutorial: Installation for Py OpenCV
      • Tutorial: OpenCv (Python) Basics
    • LAB
      • Lab Report Template
      • Lab Report Grading Criteria
      • LAB Report Instruction
      • LAB: Grayscale Image Segmentation
        • LAB: Grayscale Image Segmentation -Gear
        • LAB: Grayscale Image Segmentation - Bolt and Nut
      • LAB: Color Image Segmentation
        • LAB: Facial Temperature Measurement with IR images
        • LAB: Magic Cloak
      • LAB: Straight Lane Detection and Departure Warning
      • LAB: Dimension Measurement with 2D camera
      • LAB: Tension Detection of Rolling Metal Sheet
  • Deep Learning for Perception
    • Notes
      • Lane Detection with Deep Learning
      • Overview of Deep Learning
        • Object Detection
        • Deep Learning Basics: Introduction
        • Deep Learning State of the Art
        • CNN, Object Detection
      • Perceptron
      • Activation Function
      • Optimization
      • Convolution
      • CNN Overview
      • Evaluation Metric
      • LossFunction Regularization
      • Bias vs Variance
      • BottleNeck Unit
      • Object Detection
      • DL Techniques
        • Technical Strategy by A.Ng
    • Tutorial - PyTorch
      • Tutorial: Install PyTorch
      • Tutorial: Python Numpy
      • Tutorial: PyTorch Tutorial List
      • Tutorial: PyTorch Example Code
      • Tutorial: Tensorboard in Pytorch
      • Tutorial: YOLO in PyTorch
        • Tutorial: Yolov8 in PyTorch
        • Tutorial: Train Yolo v8 with custom dataset
          • Tutorial: Train Yolo v5 with custom dataset
        • Tutorial: Yolov5 in Pytorch (VS code)
        • Tutorial: Yolov3 in Keras
    • LAB
      • Assignment: CNN Classification
      • Assignment: Object Detection
      • LAB: CNN Object Detection 1
      • LAB: CNN Object Detection 2
      • LAB Grading Criteria
    • Tutorial- Keras
      • Train Dataset
      • Train custom dataset
      • Test model
      • LeNet-5 Tutorial
      • AlexNet Tutorial
      • VGG Tutorial
      • ResNet Tutorial
    • Resource
      • Online Lecture
      • Programming tutorial
      • Books
      • Hardware
      • Dataset
      • Useful sites
  • Must Read Papers
    • AlexNet
    • VGG
    • ResNet
    • R-CNN, Fast-RCNN, Faster-RCNN
    • YOLOv1-3
    • Inception
    • MobileNet
    • SSD
    • ShuffleNet
    • Recent Methods
  • DLIP Project
    • Report Template
    • DLIP 2021 Projects
      • Digital Door Lock Control with Face Recognition
      • People Counting with YOLOv4 and DeepSORT
      • Eye Blinking Detection Alarm
      • Helmet-Detection Using YOLO-V5
      • Mask Detection using YOLOv5
      • Parking Space Management
      • Vehicle, Pedestrian Detection with IR Image
      • Drum Playing Detection
      • Turtle neck measurement program using OpenPose
    • DLIP 2022 Projects
      • BakeryCashier
      • Virtual Mouse
      • Sudoku Program with Hand gesture
      • Exercise Posture Assistance System
      • People Counting Embedded System
      • Turtle neck measurement program using OpenPose
    • DLIP Past Projects
  • Installation Guide
    • Installation Guide for Pytorch
      • Installation Guide 2021
    • Anaconda
    • CUDA cuDNN
      • CUDA 10.2
    • OpenCV
      • OpenCV Install and Setup
        • OpenCV 3.4.13 with VS2019
        • OpenCV3.4.7 VS2017
        • MacOS OpenCV C++ in XCode
      • Python OpenCV
      • MATLAB-OpenCV
    • Framework
      • Keras
      • TensorFlow
        • Cheat Sheet
        • Tutorial
      • PyTorch
    • IDE
      • Visual Studio Community
      • Google Codelab
      • Visual Studio Code
        • Python with VS Code
        • Notebook with VS Code
        • C++ with VS Code
      • Jupyter Notebook
        • Install
        • How to use
    • Ubuntu
      • Ubuntu 18.04 Installation
      • Ubuntu Installation using Docker in Win10
      • Ubuntu Troubleshooting
    • ROS
  • Programming
    • Python_Numpy
      • Python Tutorial - Tips
      • Python Tutorial - For Loop
      • Python Tutorial - List Tuple, Dic, Set
    • Markdown
      • Example: API documentation
    • Github
      • Create account
      • Tutorial: Github basic
      • Tutorial: Github Desktop
    • Keras
      • Tutorial Keras
      • Cheat Sheet
    • PyTorch
      • Cheat Sheet
      • Autograd in PyTorch
      • Simple ConvNet
      • MNIST using LeNet
      • Train ConvNet using CIFAR10
  • Resources
    • Useful Resources
    • Github
Powered by GitBook
On this page
  • Installing OpenCV 4.9.0 with Visual Studio 2022
  • PATH 환경설정
  • OpenCV 프로젝트 속성시트(Property sheet)만들기
  • Debug x64 Property Sheet 만들기
  • Release x64 Property Sheet 만들기
  • Demo Program

Was this helpful?

  1. Installation Guide
  2. OpenCV

OpenCV Install and Setup

PreviousOpenCVNextOpenCV 3.4.13 with VS2019

Last updated 2 months ago

Was this helpful?

Installing OpenCV 4.9.0 with Visual Studio 2022

OpenCV Download link:

Opencv 설치 파일 다운로드 >> 설치 파일 압축풀기

C:\ opencv-4.9.0 폴더 새롭게 생성 >> 아래 그림과 같이 설치파일 복사

PATH 환경설정

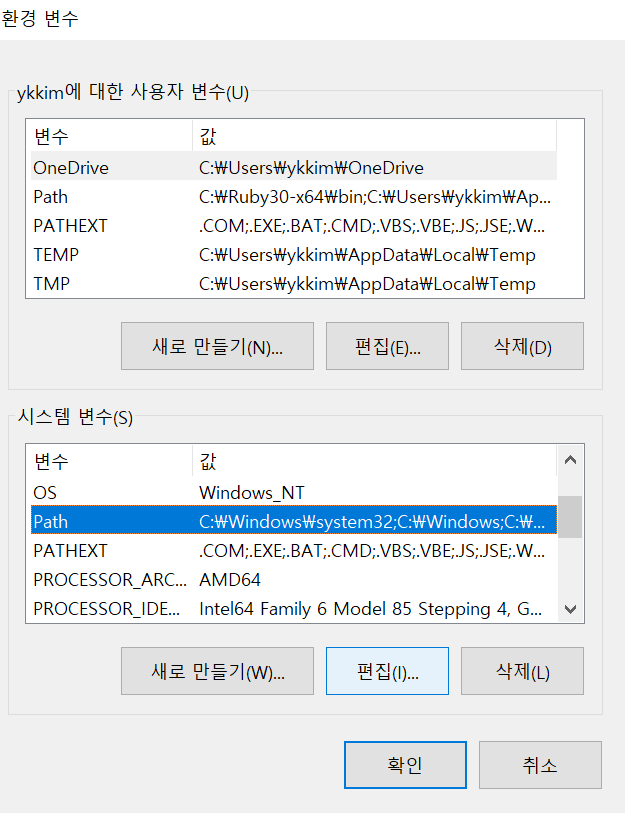
제어판> 시스템 및 보안 > 시스템 > 고급 시스템 설정 – 고급 탭 > 환경변수(N) 클릭

‘시스템 변수’ 항목에 있는 변수 명 중 Path를 찾아 편집

새로 만들기 > 찾아보기 > C:\opencv-4.9.0\build\x64\vc16\bin 선택

OpenCV dll 파일 경로 설정과정임

Path 설정 완료되면 컴퓨터 재부팅

OpenCV 프로젝트 속성시트(Property sheet)만들기

Visual Studio 2022 실행 후

  • 방법 1) 새 프로젝트 만들기 > 빈 프로젝트

  • 방법 2) 파일> 새로 만들기> 프로젝트 선택

빈 프로젝트: 프로젝트 이름 : OpenCVprop 입력 > 만들기

Debug x64 Property Sheet 만들기

메뉴: 보기>다른 창>속성 관리자 선택

속성 관리자 창 > OpenCVprop > Debug|x64 위에 RightClick.

새 프로젝트 속성 시트 추가 > 이름: opencv-4.9.0_debug_x64.props 으로 지정 > 추가

반드시 이름에 .props까지 기재할 것

Debug | x64 에서 설정.


속성관리자 창: Debug | x64 > opencv-3.4.13_debug_x64 double click

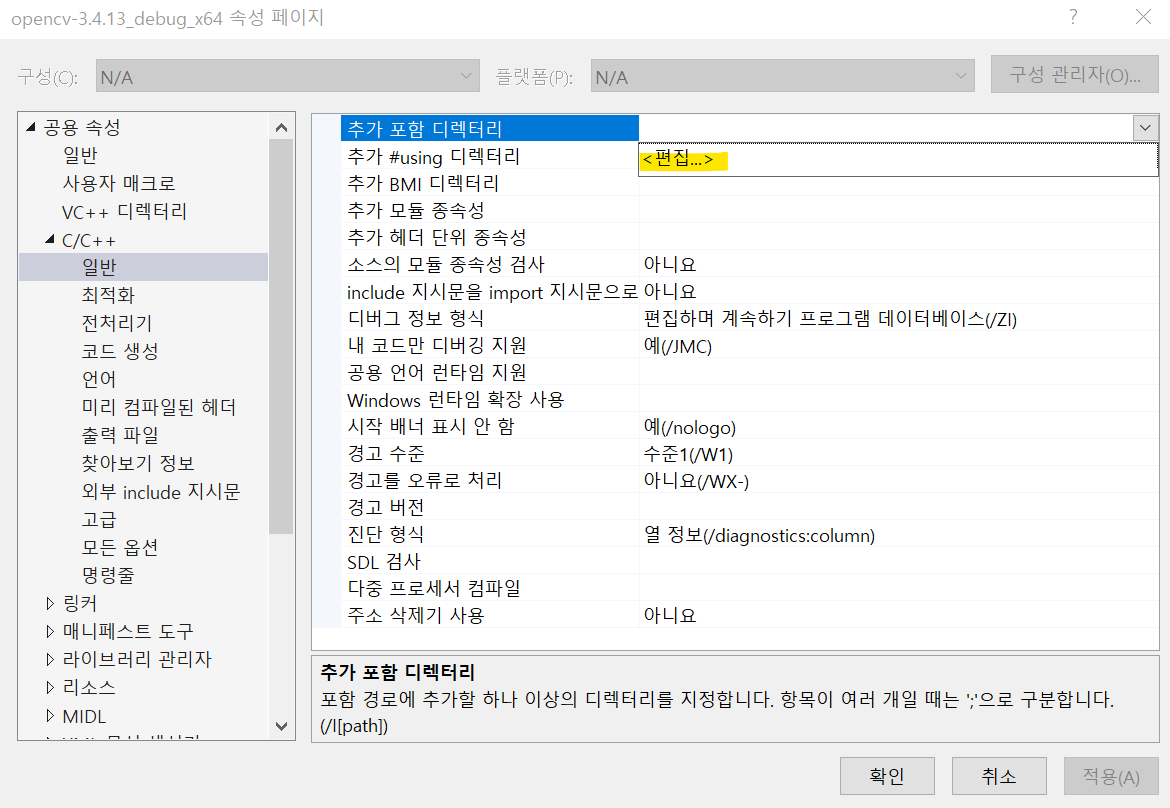
[Opencv 헤더 (include) 디렉터리 추가]

공용 속성 > C/C++ > 일반 > 추가 포함 디렉터리 > 편집

> 추가 포함 디렉터리> 줄추가 : 아래 경로들을 순서에 맞게 추가 > 확인

  • C:\opencv-4.9.0\build\include

  • C:\opencv-4.9.0\build\include\opencv2

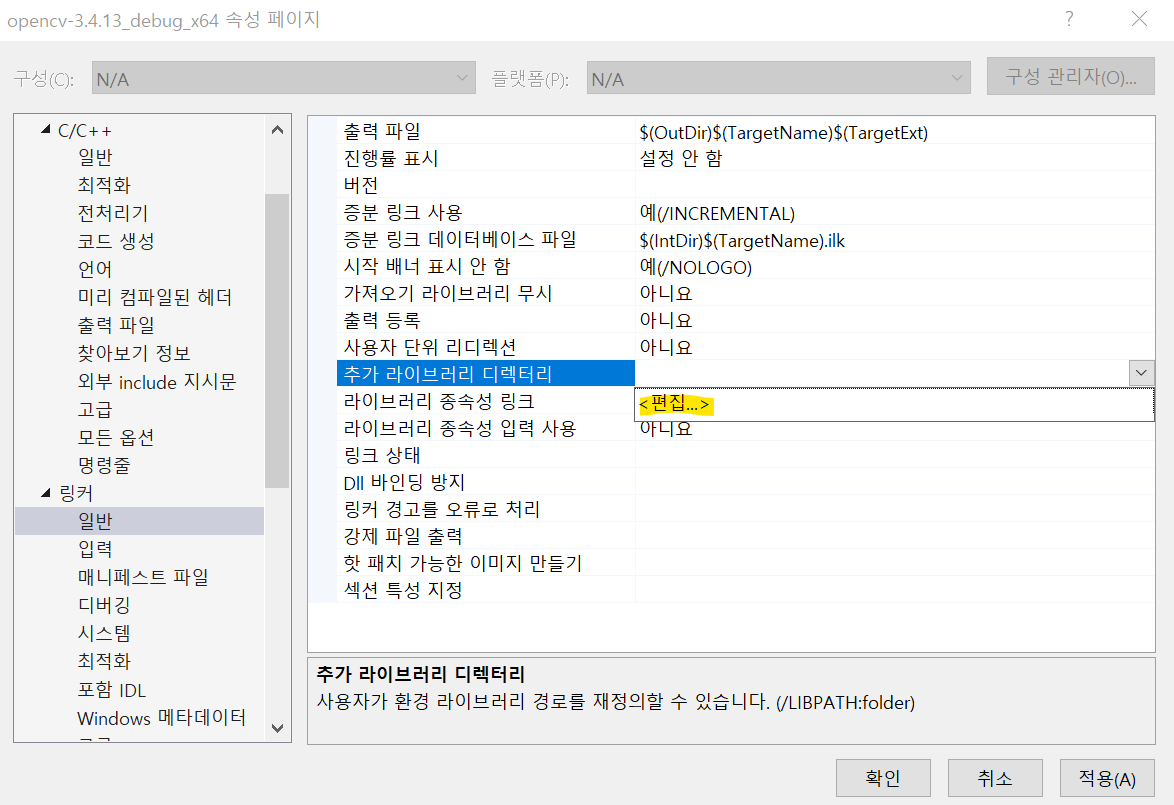
[ OpenCV lib 디렉터리 추가]

공용 속성 > 링커 > 일반 > 추가 라이브러리 디렉터리 > 편집 > 추가 라이브러리 디렉터리

  • C:\opencv-4.9.0\build\x64\vc16\lib 추가

[ OpenCV lib 파일 추가]

공용 속성> 링커 > 입력 > 추가 종속성> 편집

  • opencv_world490d.lib 경로 추가

debug 모드에서는 'd' (xxx490d.lib) 로 표시된 파일을 추가

(중요)

위 설정 완료 후 반드시 opencv-4.9.0_debug_x64 저장

Release x64 Property Sheet 만들기

속성 관리자 창 > OpenCVprop > Release|x64 : RightClick.

새 프로젝트 속성 시트 추가 > 이름: opencv-4.9.0_release_x64.props으로 지정 후 추가

위에 설명한 Debug x64 Property Sheet 만들기 과정과 유사하며, 아래 경로를 추가하여 반복

공용 속성 > C/C++ > 일반 > 추가 포함 디렉터리 > 경로추가

  • C:\opencv-4.9.0\build\include

  • C:\opencv-4.9.0\build\include\opencv2

공용 속성 > 링커 > 일반 > 추가 라이브러리 디렉터리 > 경로 추가

  • C:\opencv-4.9.0\build\x64\vc16\lib

공용 속성> 링커 > 입력 > 추가 종속성> 경로추가

  • opencv_world490.lib

release에서는 'opencv_world490.lib' 로 해야함. ('***d.lib)는 아님!!. ', debug 에서만 'opencv_world490d.lib' 로 설정해야 함

(중요)

위 설정 완료 후 반드시 opencv-4.9.0_release_x64 저장

Demo Program

Follow the Tutorial: Create OpenCV Project

image
image
image
Tutorial: Create OpenCV Project
https://opencv.org/releases/