Tutorial: Zigbee with Nucleo board
Installation
[Download XCTU] https://hub.digi.com/support/products/xctu/?path=/support/asset/xctu-installer/
Zigbee Configuration
Preperation
This section explains how to setup the zigbee network configuration for communication. To set network channel, ID of zigbee, you need to download XCTU software and prepare hardwares.
Arduino Uno (R3)
Xbee ZigBee TH(S2C)
XBee Shield 3.0
Then, connect hardwares like fig below and set toggle switch as USB

XCTU software setup
After assemble Xbee module and Xbee shield to Arduino Uno board, connect Arduino board to pc via usb and turn on XCTU software.

Find Xbee module
Check port, board name and select port
After choose port, push next
Check port number and add select device to XCTU

Select Xbee module
Select Update
Choose firmware which selected.
Select Update
Trouble shooting

While XCTU software setup process if a reset error occurs, please follow the steps below.
Remove the shield and Zigbee from the Arduino board, load the Arduino empty code and check the port.
Choose compile and upload.
Xbee Network channel, ID configuration
After setting the ZigBee firmware, select the ZigBee of the changed firmware as shown below and set the network channel and ID. (Initial value - CH : C / ID : 3332)
Network Channel range (0x0B - 0x1A)
Network ID range (0x0 - 0xFFFF)

Xbee Serial Communication
Communication through XCTU
Repeat software setup and network channel, ID configuration process for another Xbee. Set the same network channel and ID as Zigbee to communicate. After registering 2 Zigbee modules at the same time, follow the procedure below to communicate.

Discover Xbee in the same network.
Open console window.
Connect communication.
Select another xbee module.
Connect communication.
Send text to other ZigBee modules and check if communication is possible.
Serial communication using STM32 board

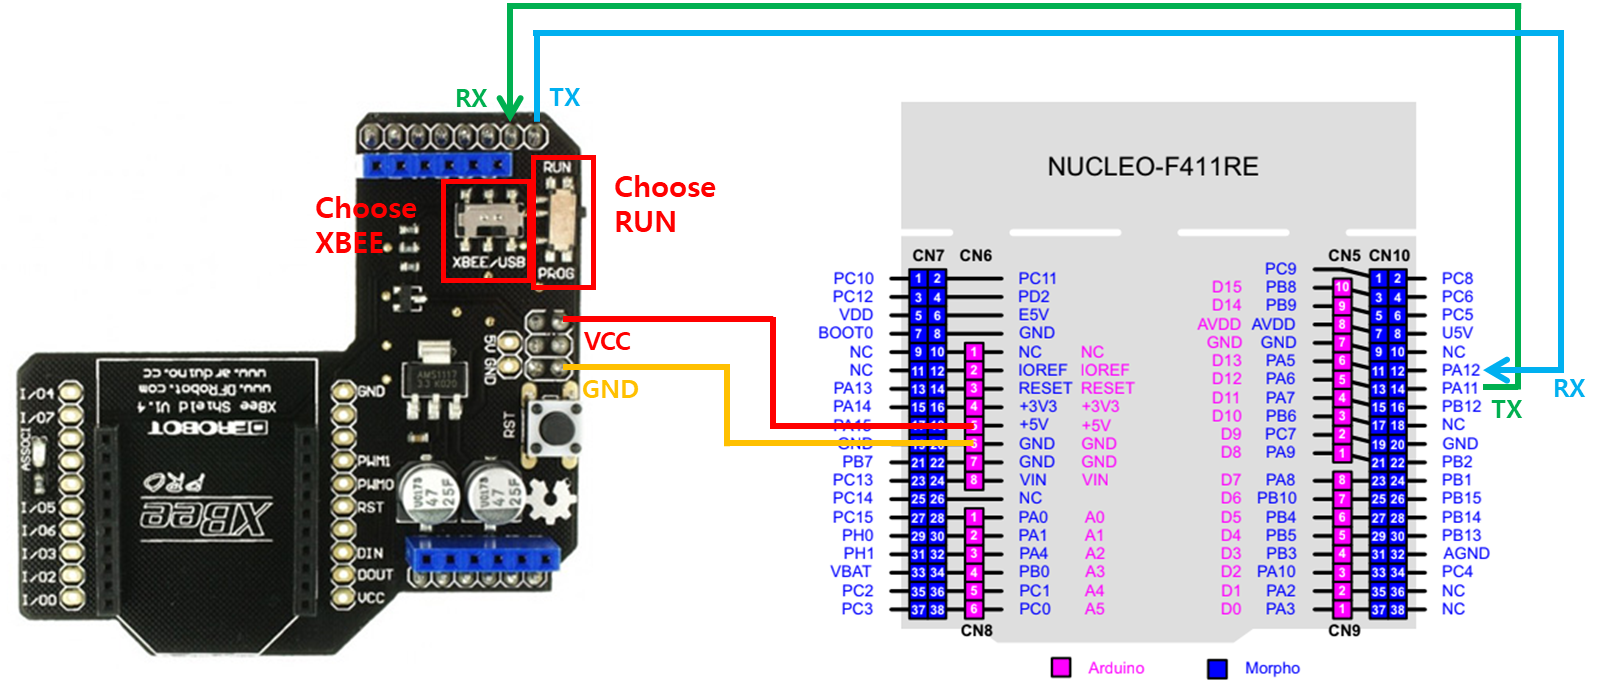
In order to communicate with Xbee through stm32 board, VCC, Ground, TX, RX must be connected from the xbee shield. In the case of STM32 f411RE board, USART2 is fixed to usb communication, so select between USART1 and USART6 and connect it to RX of the shield - TX of the board / TX of the shield - RX of the board.
Last updated