💾
EC
  • Introduction
  • EC Course
    • Syllabus
    • Preparation for EC
    • Tutorial
      • Tutorial: arduino-stm32
        • Tutorial: arduino-stm32 Installation
        • Tutorial: arduino-stm32 Part1
        • Tutorial: arduino-stm32 Part2
      • Tutorial: MDK uVision
        • Tutorial: Installing MDK uVision
        • Tutorial: Create a Project with uVision
        • Tutorial: Adding library header in uVision
        • Tutorial: Re-using Project Configuration
        • Debugging in uVision
      • Tutorial: PlatformIO in CLion
      • Tutorial: PlatformIO in VSCode
      • Tutorial: Repository Management
      • Tutorial: Managing library header files
      • Tutorial: PinName Configuration
      • Tutorial: Bitwise Macro
      • Tutorial: Custom initialization
      • Tutorial: Documentation
      • Tutorial: Creating Application API
      • Tutorial: 7-Segment Display
      • Tutorial: DC motor driver connection
      • Tutorial: USART with TeraTerm
      • Tutorial: Finite State Machine programming
      • Tutorial: Bluetooth
      • Tutorial: Zigbee with Nucleo board
    • LAB
      • LAB Report Template
      • LAB: Smart mini-fan with STM32-duino
      • LAB: Portable Fan with mbed
      • LAB: GPIO Digital InOut
      • LAB: GPIO Digital InOut 7-segment
      • LAB: EXTI & SysTick
      • LAB: Timer & PWM
      • LAB: Stepper Motor
      • LAB: Input Capture - Ultrasonic
      • LAB: USART - LED, Bluetooth
      • LAB: ADC - IR reflective sensor
      • LAB: Line Tracing RC Car
    • Sample code
      • Code Templates
    • Hardware
      • Nucleo-F411RE
      • LAB Hardware
        • Electronic Chips
        • HUINS Embedded Kit
    • Projects
      • Line Tracing Car Project
      • Design Project
        • Past Projects
      • Project Grading Criteria
    • Study Resource for MCU
      • Hexa-Decimal Table
      • Bitwise Op for Register
      • System Clock
      • Timer
      • USART
      • ADC
  • STM32 M4 Programming
    • Documentation
      • C++ API Docs
    • Firmware Library
      • PinName Configuration
      • GPIO Digital
      • RCC
      • EXTI_SysTick
      • TIMER
      • USART
    • Troubleshooting
    • mbed for STM32
      • Tutorial: mbed-Part 1
      • Tutorial: mbed - Part 2
      • Tutorial: mbed - Part 3
      • Using mbed API on uVision
    • mbed OS
  • Other Programming
    • Arduino
    • Socket Programming
      • Window Socket Programming
      • Arduino WiFi
    • Cube-MX
    • Github
    • Markdown
      • Example: API documentation
    • MATLAB
  • C Programming
    • C-Programming Lessons
      • Installing Visual Studio Community
        • Visual Studio Community 2022
      • Installing VS Code(Mac/Linux)
      • Creating Header Lib
      • Pointer
      • Array
      • 2D Array
      • Structure
      • Dynamic Alloc
      • Bitwise Operation
  • Numerical Programming
    • Syllabus
    • Preparation for NP
    • Math Review
    • Tutorial
      • TA Session Video
      • Tutorial: NP Library Header Files
      • Tutorial - Sine Taylor
      • Tutorial: Passing a Function, Function callback
      • Tutorial: Nonlinear solver
      • Tutorial: Differentiation
      • Tutorial: Integration
      • Tutorial: Matrix Structure
      • Tutorial: Eigenvalue problem
      • Tutorial: ODE-IVP
      • Tutorial: Curve Fitting
      • Tutorial: Create Github Repos of NP lib
      • Tutorial: Version Control in Github
      • Tutorial: Documentation with Markdown
      • Exercise: Version Control and Documentation
    • Example: MATLAB
    • Example: NP Library
    • Assignment
      • Assignment Factorial and Power
      • Assignment: Version Control and Documentation
    • Problem Bank
Powered by GitBook
On this page
  • Installation
  • Zigbee Configuration
  • Xbee Serial Communication

Was this helpful?

  1. EC Course
  2. Tutorial

Tutorial: Zigbee with Nucleo board

PreviousTutorial: BluetoothNextLAB

Last updated 2 years ago

Was this helpful?

Installation

[Download XCTU] https://hub.digi.com/support/products/xctu/?path=/support/asset/xctu-installer/

Zigbee Configuration

Preperation

This section explains how to setup the zigbee network configuration for communication. To set network channel, ID of zigbee, you need to download XCTU software and prepare hardwares.

  1. Arduino Uno (R3)

  2. Xbee ZigBee TH(S2C)

  3. XBee Shield 3.0

Then, connect hardwares like fig below and set toggle switch as USB

XCTU software setup

After assemble Xbee module and Xbee shield to Arduino Uno board, connect Arduino board to pc via usb and turn on XCTU software.

  1. Find Xbee module

  2. Check port, board name and select port

  3. After choose port, push next

  4. Check port number and add select device to XCTU

  1. Select Xbee module

  2. Select Update

  3. Choose firmware which selected.

  4. Select Update

Trouble shooting

While XCTU software setup process if a reset error occurs, please follow the steps below.

  1. Remove the shield and Zigbee from the Arduino board, load the Arduino empty code and check the port.

  2. Choose compile and upload.

Xbee Network channel, ID configuration

After setting the ZigBee firmware, select the ZigBee of the changed firmware as shown below and set the network channel and ID. (Initial value - CH : C / ID : 3332)

Network Channel range (0x0B - 0x1A)

Network ID range (0x0 - 0xFFFF)

Xbee Serial Communication

Communication through XCTU

Repeat software setup and network channel, ID configuration process for another Xbee. Set the same network channel and ID as Zigbee to communicate. After registering 2 Zigbee modules at the same time, follow the procedure below to communicate.

  1. Discover Xbee in the same network.

  2. Open console window.

  3. Connect communication.

  4. Select another xbee module.

  5. Connect communication.

  6. Send text to other ZigBee modules and check if communication is possible.

Serial communication using STM32 board
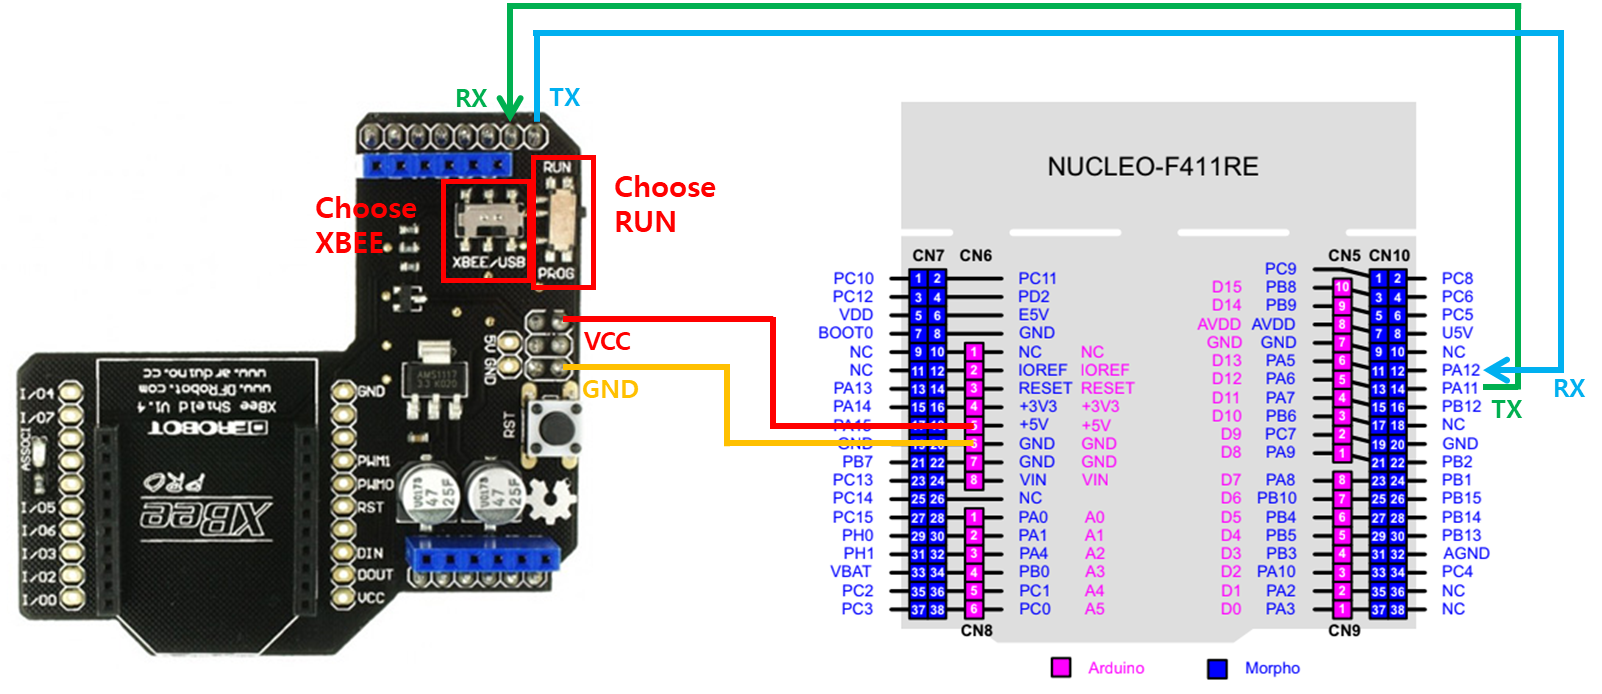
In order to communicate with Xbee through stm32 board, VCC, Ground, TX, RX must be connected from the xbee shield. In the case of STM32 f411RE board, USART2 is fixed to usb communication, so select between USART1 and USART6 and connect it to RX of the shield - TX of the board / TX of the shield - RX of the board.

image